Creating Procedural 3D Fog In Nuke
How to set up an extremely lightweight and infinitely manoeuvrable 3D noise pattern, and fly your camera through it…

How to set up an extremely lightweight and infinitely manoeuvrable 3D noise pattern, and fly your camera through it…
Infinite 3D Noise
If you’ve ever created large-scale fog, smoke, or clouds using the particle system in Nuke, you’ll know that:
- It can get very slow and heavy, both to work with and to render.
- Even with thousands of particles (e.g. Cards with noise/atmos textures), the fog may still not look dense enough, and/or cover a large enough area.
- Depending on how extreme the camera movement is, the flatness of the sprites may be revealed, breaking the effect.
So let’s bypass the particle system and use a completely different technique to create 3D fog.
We’ll make a setup which is super lightweight, that can create fog as dense or sparse as you want it to be, and that can handle any camera move – because the noise pattern which is used to make it is both three dimensional and infinite in all directions.
Out of the box, Nuke doesn’t really have a procedural 3D noise that you can fly a camera through. (It would be amazing if it did, if anyone from The Foundry is reading!).
However, Nuke does have the ability to generate procedural 3D noise. – Perhaps unintuitively, in the standard (2D) Noise node! Like Xavier Bourque explains in this video, when viewing the Noise node in Nuke, what we’re actually seeing is a 2D slice of a 3D noise pattern.
We can move through the 3D noise pattern of the Noise node by adjusting the translate X and Y values in the Transform tab, and the Z value in the Noise tab. The X and Y values will effectively move the noise in X and Y, and the Z value will move the slice that we’re seeing, along the Z axis.
It’s very similar to an MRI scan; the Z value is slicing through the 3D shape of the noise:
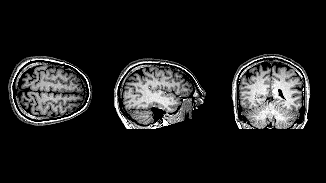
An MRI scan showing individual slices of the brain.
Okay, so we can navigate the 3D noise, but there isn’t an option in Nuke for connecting a Camera to the Noise node in order to fly through it. So how can we work around this?
Propagating The Slice
By combining some techniques, I’ve found a way to make a Camera smoothly slice through the 3D noise in Nuke.
First, we need to link a Card to the Camera’s frustum.
Open up the Projection tab of your Camera’s properties, and the Card tab of your Card’s properties. Then, hold Ctrl (Cmd) and left-click drag the Focal Length value of the Camera to the lens-in-focal value of the Card.
Next, do the same but instead drag the Horizontal Aperture value of the Camera to the lens-in-haperture value of the Card.
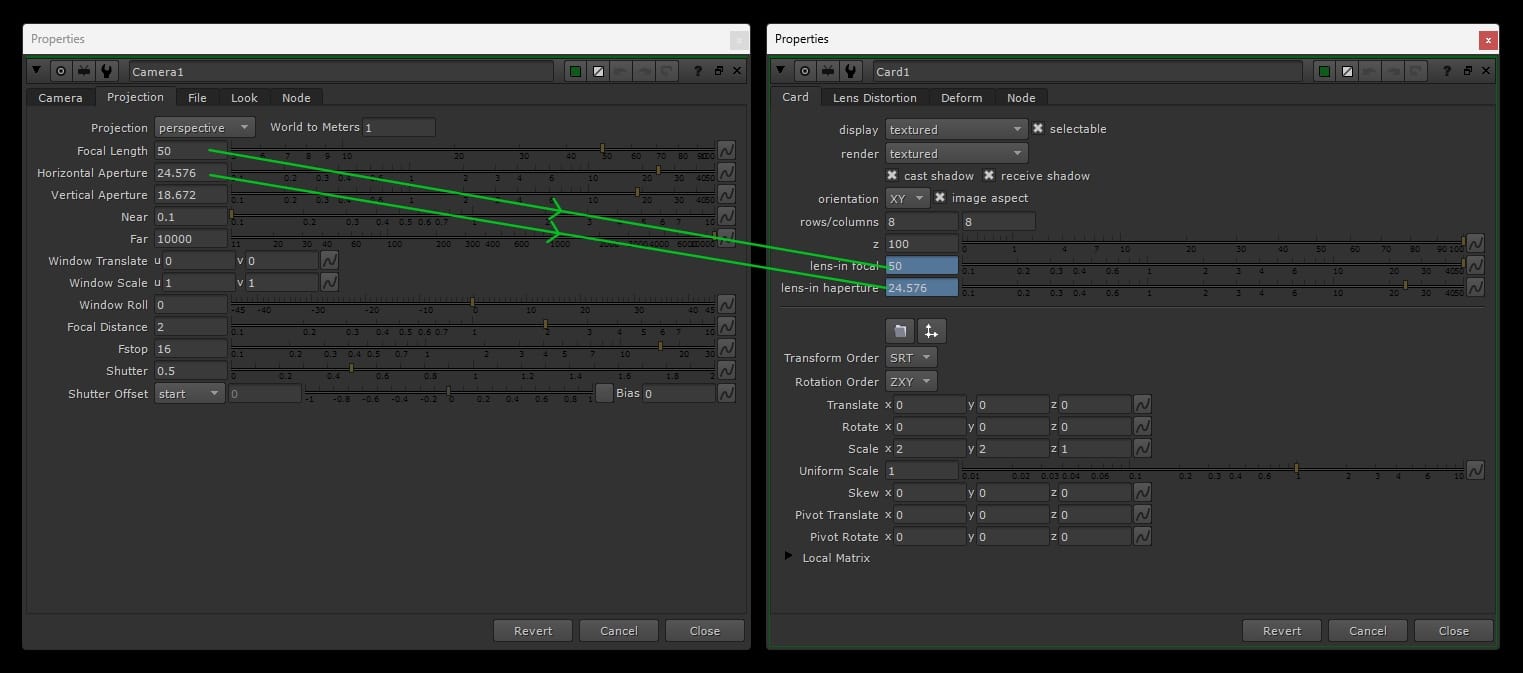
Linking a Card to the Camera’s frustum.
This will snap the Card to the Camera’s frustum. You can adjust the Z value of the Card to move it closer to or further away from the camera, along the camera’s frustum. I set mine to 100 in this example.
To have the Card follow along with the animation of your camera in 3D space, connect a TransformGeo node to the Card, and plug its axis input to your camera.
Now, you have a Card which will always stay perfectly flat-on in screen space. It will also fill the entire frame (covering the whole frustum of the camera). And, as the camera moves, the Card will follow its movement exactly, and ‘slice’ through 3D space.
Let’s connect the Card and the Camera to a ScanlineRender node.
In the properties of the ScanlineRender node, go to the Shader tab. We want to output a position pass, so tick the output vectors checkbox. Then, click on the surface point drop-down menu and either select or create a new position layer.
Below, I opted to create a new layer and named it position. Then, I clicked on the Auto: rgba button to fill in the channels automatically.
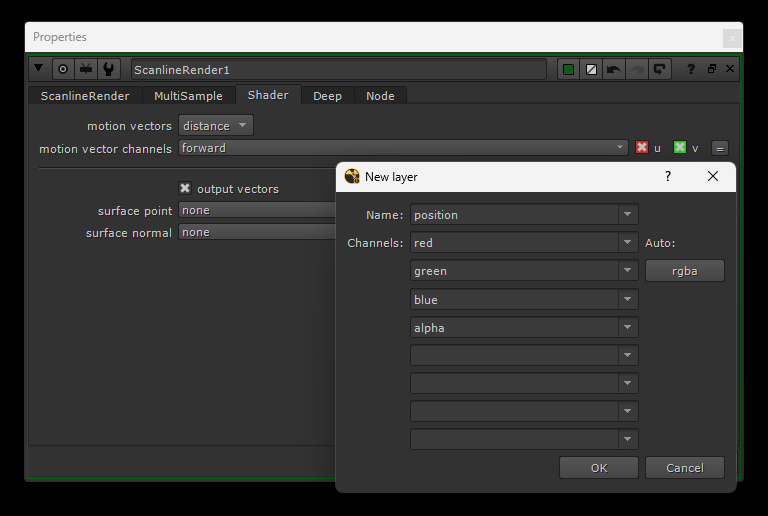
Creating a new position layer and channels.
Now, the ScanlineRender node will output a position pass, an image with position data, of where the Card is in 3D space on every frame. That means, we have the positional information of a slice of 3D space covering our entire screen. And this slice will update as the camera moves.
Nearly there now.
Internally, the Noise node is using a noise function to generate the 3D noise. And there are plenty of other tools which have recreated this. We’re interested in the so-called position noise, p_noise, or noise_3D type of tools – which you may be familiar with. They map the 3D noise onto the shape of your geometry by using a position pass.
I’m using Adrian Pueyo’s excellent aPMatte tool, which has the ability to output position noise, in addition to other useful things like position mattes and position ramps.
In this case, we’re only interested in the position noise. So after selecting our position pass in the img drop-down menu at the top, we only need to look at the controls at the very bottom of the properties:
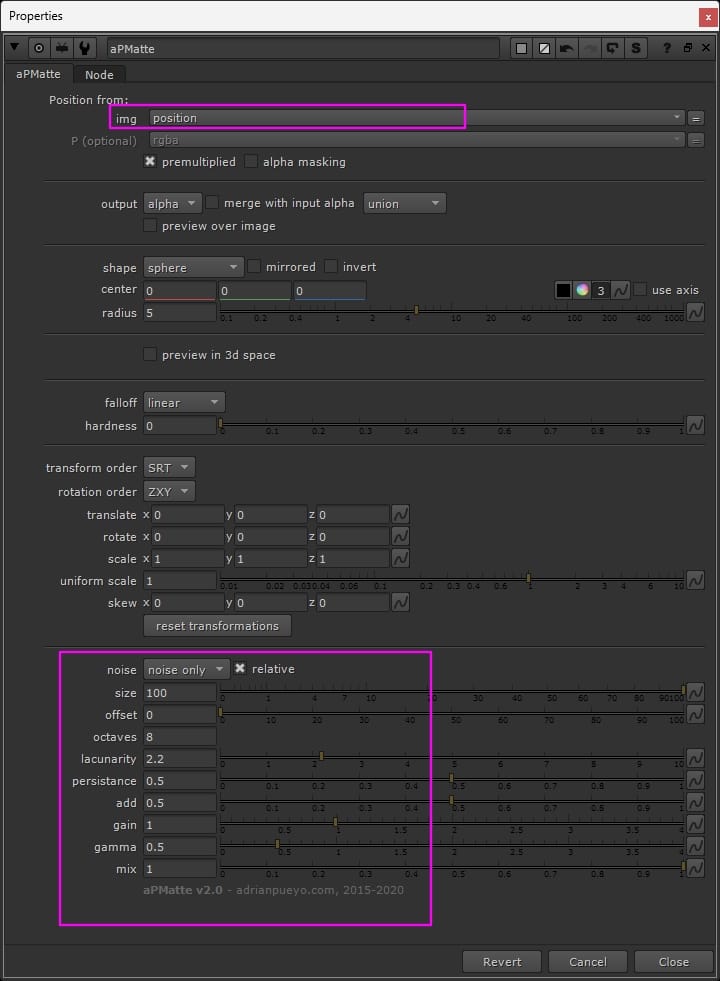
The properties of the aPMatte tool.
Select noise only in the noise drop-down menu to output position noise. For this example, I set the size to 100, but adjust as needed for your shot. Also, play with the values in the lower pink box in the image above to get the right shape and density for your fog.
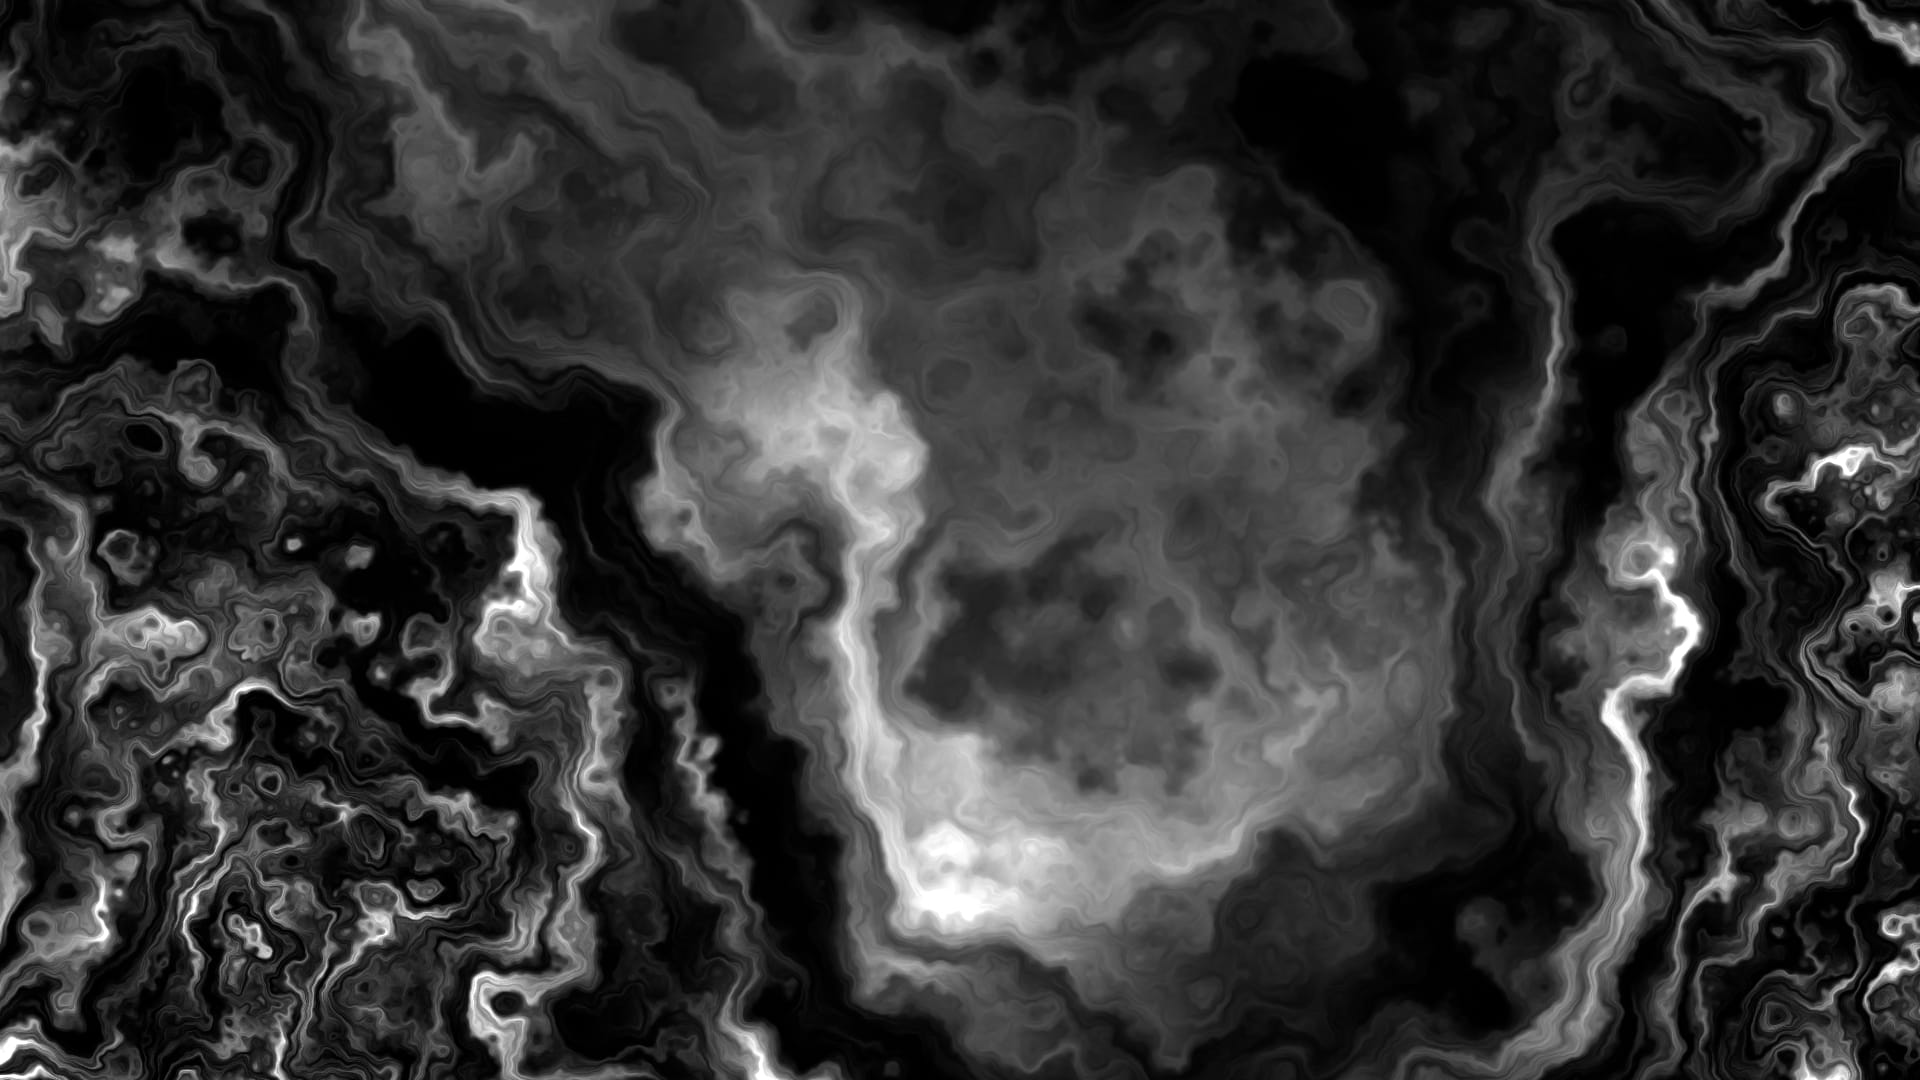
Now, when we view the alpha channel that is output by the aPMatte tool while playing the shot, we can see our camera flying through the 3D noise, one slice at a time.
Infinite 3D noise.
We can plug in any camera, with any camera animation, because the noise is procedural – it’s infinite in all directions.
Lastly, to add a bit more control, add a Grade node in between the ScanlineRender node and the aPMatte node. Set the channels to your position pass.
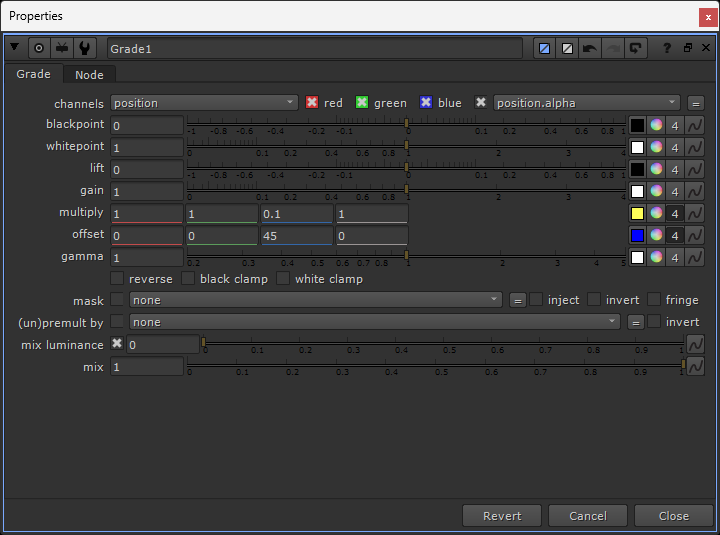
Adjusting the position pass.
With this Grade node, you can now make two important adjustments:
First, with the multiply knob, you can adjust how much the slice moves through space. If a pixel in your position pass is positioned at for example 3 units in X, you can change its position to 1.5 units in X (50%) by setting the multiply value to 0.5 in the red channel.
This applies to all the pixels in your position pass, so you’re essentially scaling the whole camera movement down – in X in this case. And so you can change how the camera moves through the noise without touching the actual camera.
Where this is especially useful, is when you’re getting a bit too much flickering as your slice travels along the Z axis in 3D space. Simply scale down the Z movement, by lowering the multiply value in the blue channel. (Above, I set it to 10% of its original movement, or a multiply value of 0.1 in the blue channel).
The second adjustment is a straight addition/subtraction of the coordinates in 3D space using the offset knob. If you want to shift your whole camera movement up by 50 units in Y, for example, just put 50 in the offset value in the green channel. (Above, I set it to shift 45 units along the Z axis).
This is great for moving the camera around to find the best noise pattern for your particular shot, without touching the camera itself.
Overscan
If you want to output your noise with overscan, you can increase the overscan value in the ScanlineRender node.
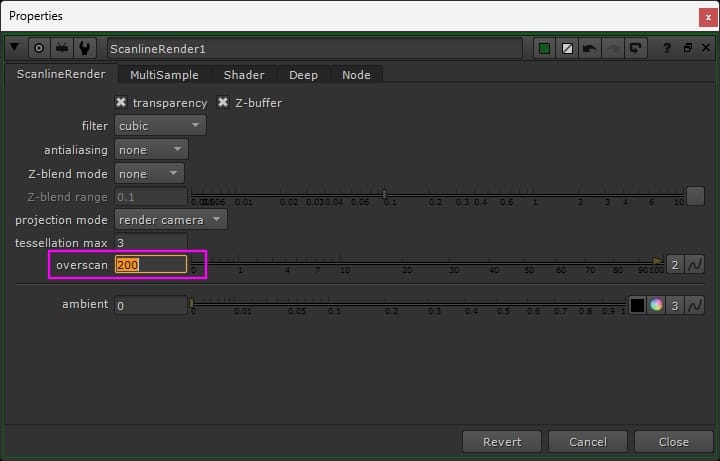
Outputting overscan from the ScanlineRender node.
However, if you didn’t touch its scale yet, the Card will currently fit perfectly to the frustum and therefore crop out any overscan.
So, make sure that your Card is large enough to cover the overscan. I set my Card’s X and Y Scale values to 2. This allows for tons of overscan, should I need it.
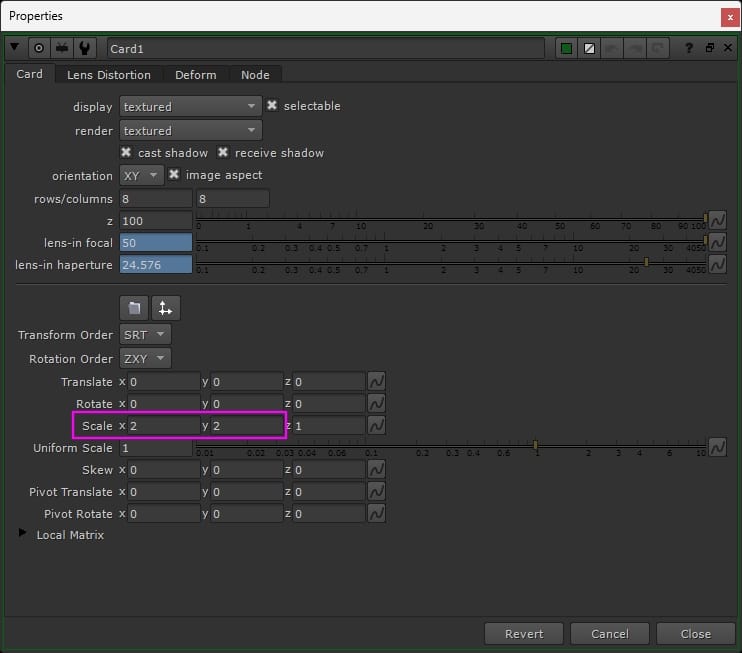
Scaling up the Card to allow for overscan.
And now, with this little, lightweight setup, you can fly any camera through infinite fog. You can pick whereabouts in the fog you want to be, and you can choose how large or small, and how dense or sparse, the fog is.
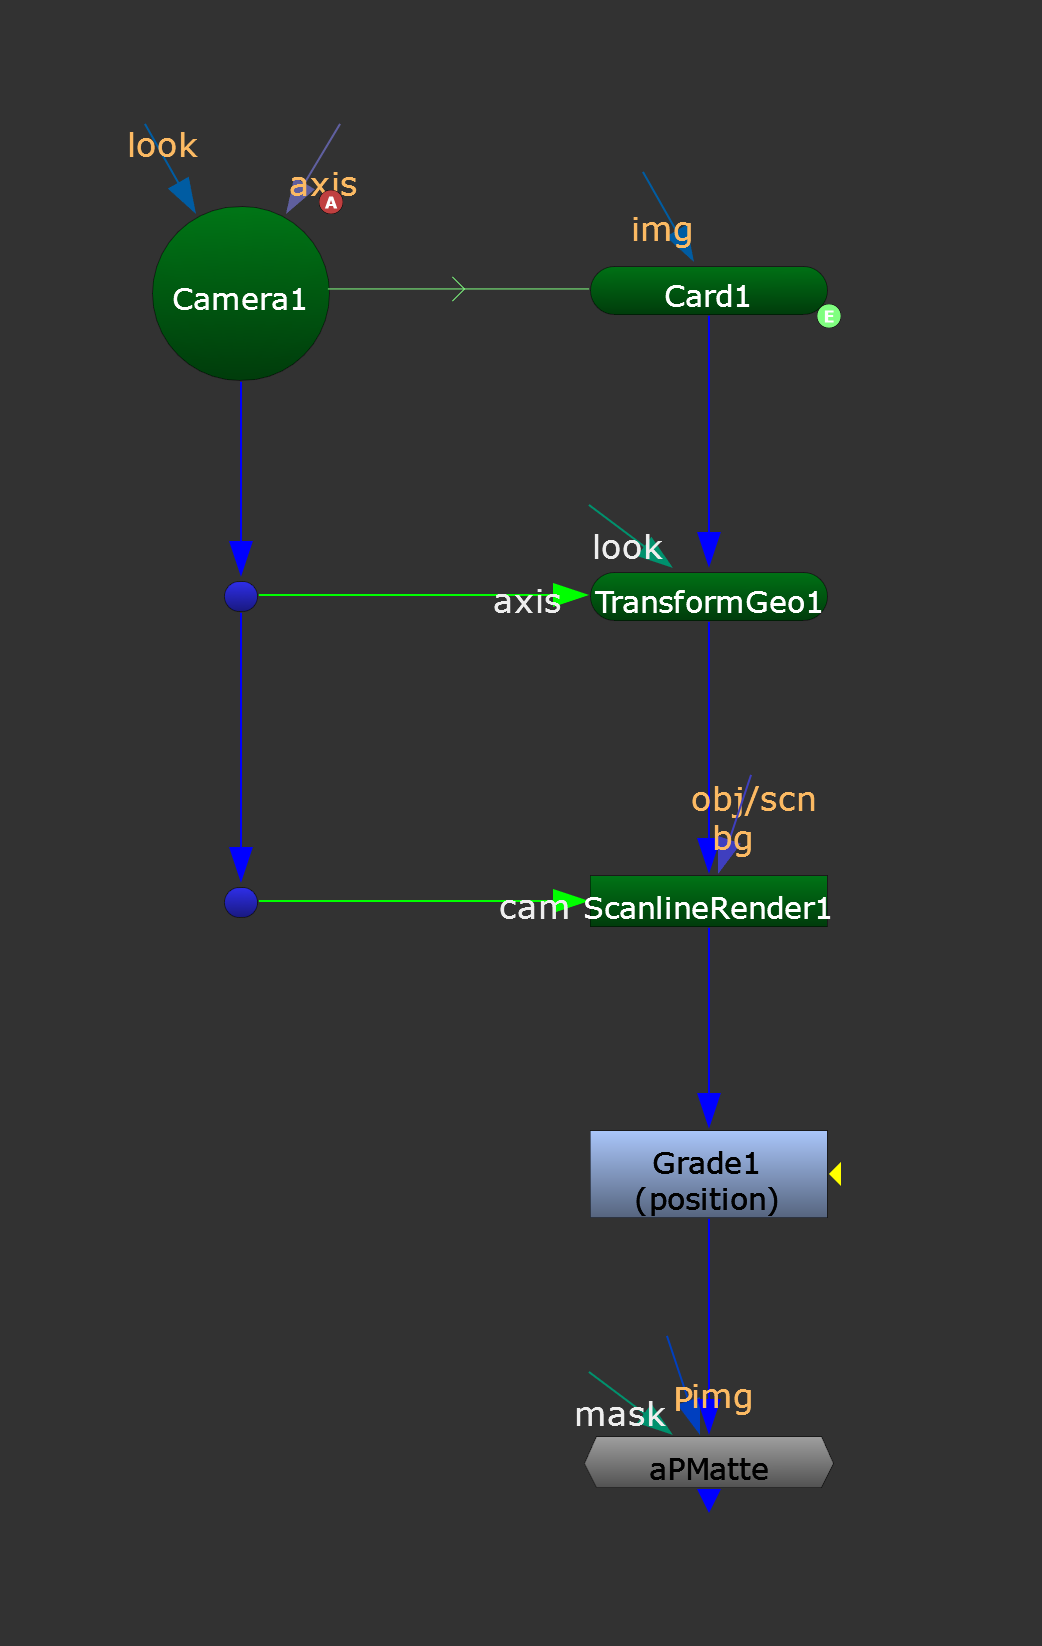
The final setup.
From here, you would either shuffle your alpha channel into RGB, or copy it into your custom RGB, and it’s ready to comp!
Limitations
Although you are flying your camera through 3D noise, you’re only ever seeing one slice of the 3D noise at a time.
You can pick the distance of the slice from the camera (Z value in the Card), but unless you animate it, the fog won’t go closer towards the camera (or past the camera) than the slice distance you initially set.
So this setup is best used as a background and/or midground layer of fog, to fill in the gaps and provide more density, complimenting your more bespoke foreground fog.
There are two benefits to this: you don’t need a super heavy particle system covering an enormous area to accommodate a large camera move, and your foreground layer of fog that flies past the camera can be much less dense (and subsequently much lighter and easier to work with in Nuke).
Finally, you can DeepMerge (holdout) your deep CG render from the output of your ScanlineRender node off to the side (make sure to connect a Constant with a white alpha to your Card first), and create a matte to mask your fog with.
However, since we’re dealing with slices here, the matte might not always be helpful. Instead, you could for example normalise the depth pass of your CG render and use it as a mask to grade your fog.
PS: By accident, I connected a copy of the aPMatte node to the first one, and got this crazy, cool pattern. Just in case it could be useful to someone looking to make this type of effect!
Doubling up the aPMatte node.
I hope you found this tutorial useful. For more Nuke tips & tricks, see Nuke.