Working With CopyCat In Nuke
How to use CopyCat to replicate a visual effect over a whole image sequence from just a small number of example frames…
How to use CopyCat to replicate a visual effect over a whole image sequence from just a small number of example frames…
Time Saver
We've been using CopyCat at work for a while now, for example to assist with temp roto and core roto on long shots.
And it’s actually been quite useful. With a little bit of setup, you can get hundreds of frames of roto for “free”, and save a lot of time.
The same goes for clean up or beauty work, deblurring or upscaling – and even creative effects.
But it seems like quite a few people have never tried using CopyCat before, so here’s how it all works:
Machine Trial And Error
Using supervised machine learning, the CopyCat node trains a neural network to build a model for copying a visual effect from a small number of example frames and applying it to a full image sequence (via the Inference node).
CopyCat compares a selection of “before and after” example images – the Input and Ground Truth – and learns how to alter the pixels of each “before” image through a weighted decision tree, in order to get it to match up to its corresponding “after” image.
It does this by adjusting and fine-tuning the model weights (the network’s learnable parameters) through a massive amount of trial and error, constantly course-correcting itself, until the difference between the “before” and “after” images is at, or near, zero.
The resulting model ends up with a large set of specific “rules” for what to do with the input pixels in various contexts in order to achieve the desired output across the image sequence.
The Inference node can then apply those rules to the full sequence, creating the same effect from the example images on frames it has never seen before.
Inverse Compression
Another way to think about it is to compare using CopyCat to uncompressing a compressed file on your computer.
It’s possible for the computer to compress a file (make the file size smaller) by finding repeating or very similar data patterns in the file and making a shorthand for them. Essentially, making a shorter way of describing the whole file, which takes up less space.
When uncompressing the file, the computer substitutes the shorthand for the full pattern, and you get back to the full-sized file.
Depending on the shorthand, however, some information might get lost. There could be generalisations in the shorthand description of the file (i.e. lossy compression), for example. Which could lead to some compression artefacts. You’d nearly describe the original file in full, but not quite.
In a way, CopyCat is sort of “uncompressing” the information that you provide to it – the few example image pairs – to create the same effect for the whole image sequence. It's trying to figure out the rules for uncompressing the information.
The more example images that you provide, the more accurately it can do that job. And more importantly, the more unique example images that you provide, the better the result will be. (Because there are fewer generalisations and therefore less ‘lost data’).
CopyCat can pretty easily figure out the repeating patterns – i.e. what to do with the images in the sequence that are nearly identical to your examples. But if you generalise too much, i.e. don't provide enough examples for the unique scenarios in the sequence, then CopyCat won’t know what to do with those unique patterns.
– For example, you should avoid only providing CopyCat roto examples of a person when they’re in front of one type of background, and no examples for when they’re in front of other, different types of backgrounds in the sequence.
It’s the same person, but the background is different. The repeating pattern is broken and CopyCat just won’t have enough information to go by. I.e. the ‘file compression is lossy’ and artefacts will occur.
Ideally, you’ll want to provide enough information to cover all of the unique characteristics of the sequence, while keeping the number of examples low enough that you still end up saving time overall compared to doing the effect yourself on the whole sequence.
Okay, let’s jump into Nuke and take a look at the CopyCat workflow in practice:
How To Set Up Inputs & Ground Truths
Before we even get to the CopyCat node, you have to create your sets of before and after images: the Inputs and Ground Truths.
To do that, you’ll have to play through and examine your shot, and carefully select a variety of representative frames from the scan to use as examples for CopyCat.
Depending on the effect you're looking to produce, the images which you provide CopyCat should ideally include examples of:
- The different backgrounds behind the subject/object across the shot.
- The different shapes of the silhouette of the subject/object against the background across the shot.
- The different framing and the different sizes of the subject/object in the frame across the shot.
- The different focus levels across the shot, both in focus and out of focus examples.
- The different lighting scenarios and variation in lighting across the shot.
- The different motion (both camera and object motion) and motion blur across the shot.
- The different occlusions of the subject/object across the shot, whether it’s occlusion by other objects, or by partially going out of frame.
- The different shadows or reflections over or near the subject/object across the shot.
- The different levels of detail in the subject/object across the shot.
Not all of the above will necessarily apply to your shot. However, the idea is to cover all of the key scenarios that CopyCat will need to learn to distinguish between, in order to successfully copy the effect across the whole shot.
Input
Depending on your shot, pick some representative frames from the scan, typically somewhere between 1-30, and make FrameHolds for them.
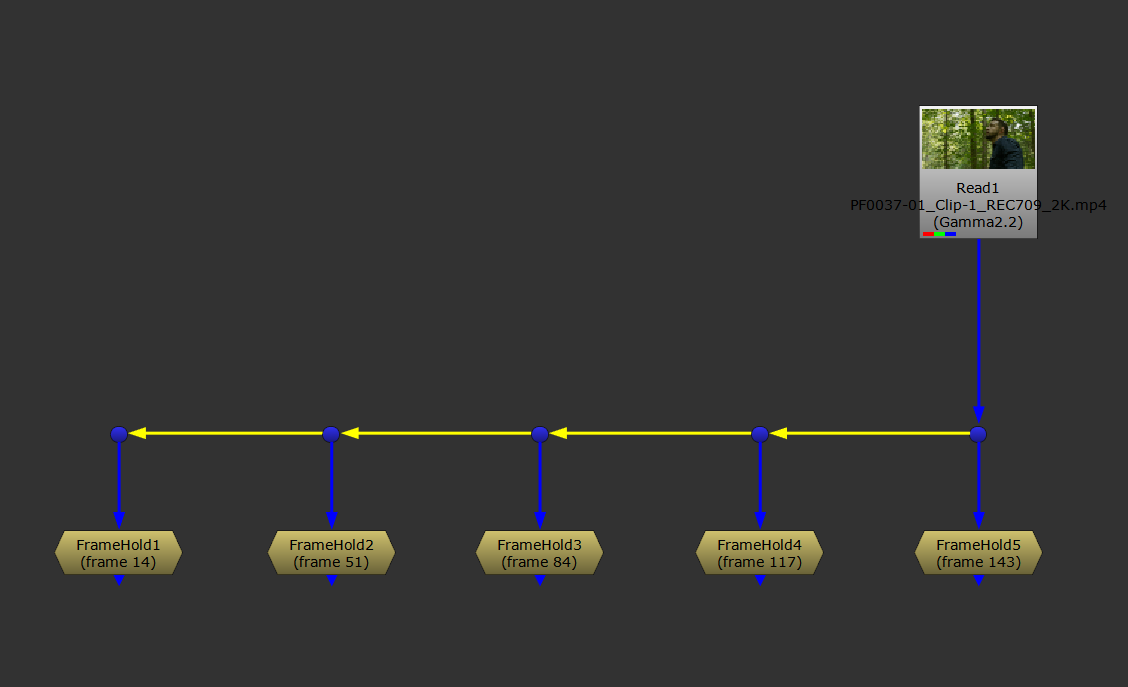
Choosing example frames from the scan.
We're going to connect all of these FrameHolds together into a new image sequence, and plug that into the Input of the CopyCat.
To make a new image sequence, we can use an AppendClip node. But currently, each FrameHold node will still play for the entire length of the current project frame range. Which means, if the frame range is 100 frames long, you'd be inputting the same image 100 times into CopyCat – for every input image.
So first, we need to make each FrameHold just play for a single frame:
Connect a FrameRange node in between the scan and the FrameHolds, and set the frame range to 1-1.
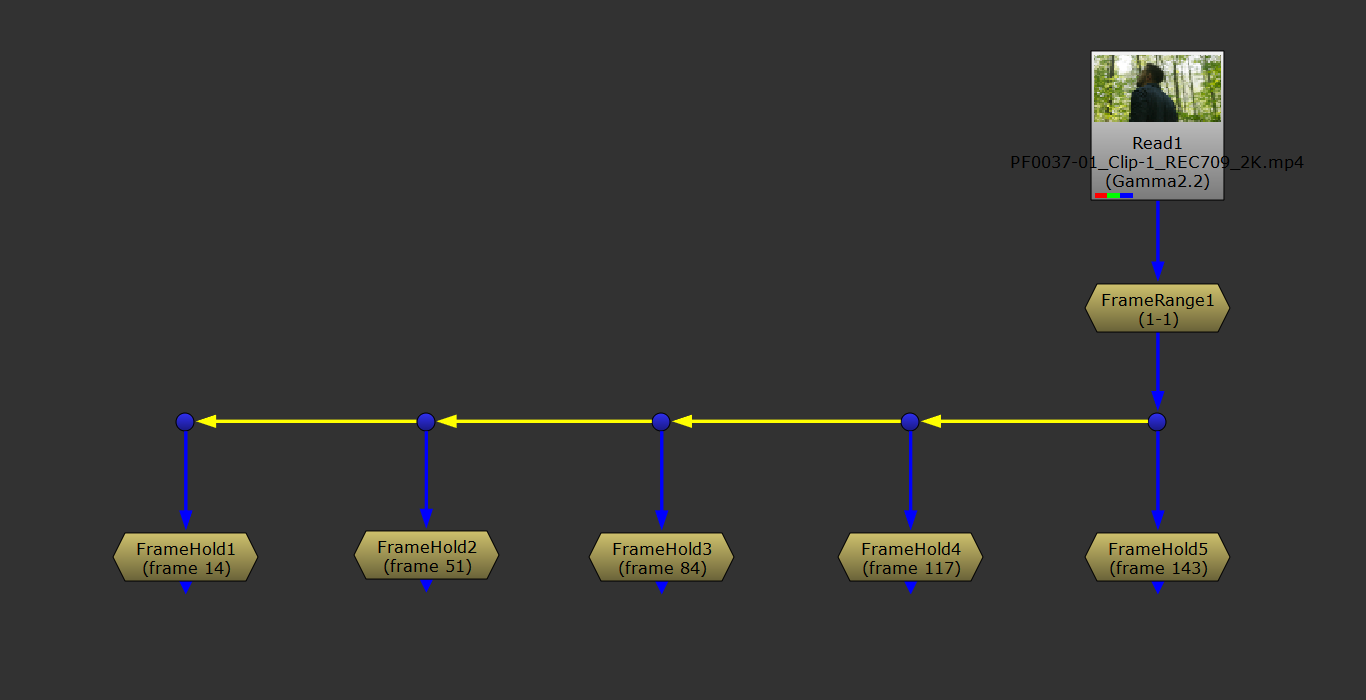
Changing the frame range of each FrameHold to a single frame by using a FrameRange node set to 1-1.
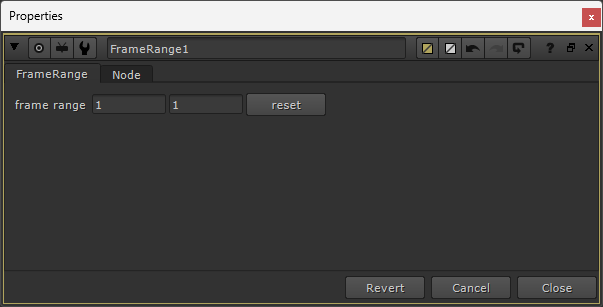
The FrameRange node's properties.
Now, we can connect up all of the FrameHolds with an AppendClip node (no need to change any of the default settings in the AppendClip), and create a new image sequence.
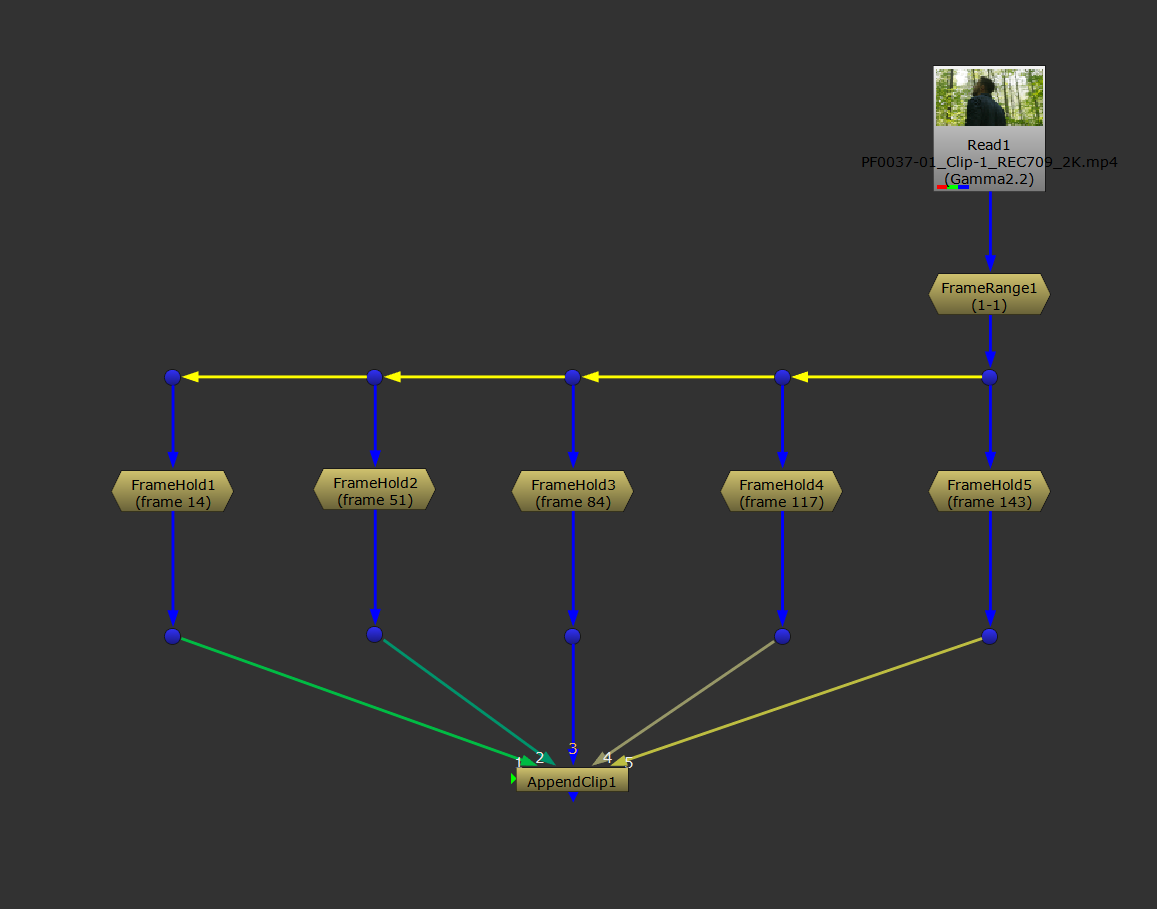
Creating a new image sequence using the AppendClip node.
That's the Input image sequence done – the “before” example images that we'll feed into CopyCat later.
Ground Truth
To make the Ground Truth image sequence, you'll apply your effect to the same frames that you selected for the Input sequence.
That effect could for example be paint work, or a roto matte shuffled into the red channel. – Whatever you want the output to look like.
You have a couple of options for making the Ground Truth image sequence:
Mirror Method
For the mirror method, select and copy the FrameHolds and the AppendClip node all together, and paste them off to the side.
With this method, you'll have two streams side by side: the Input stream, and the Ground Truth stream.
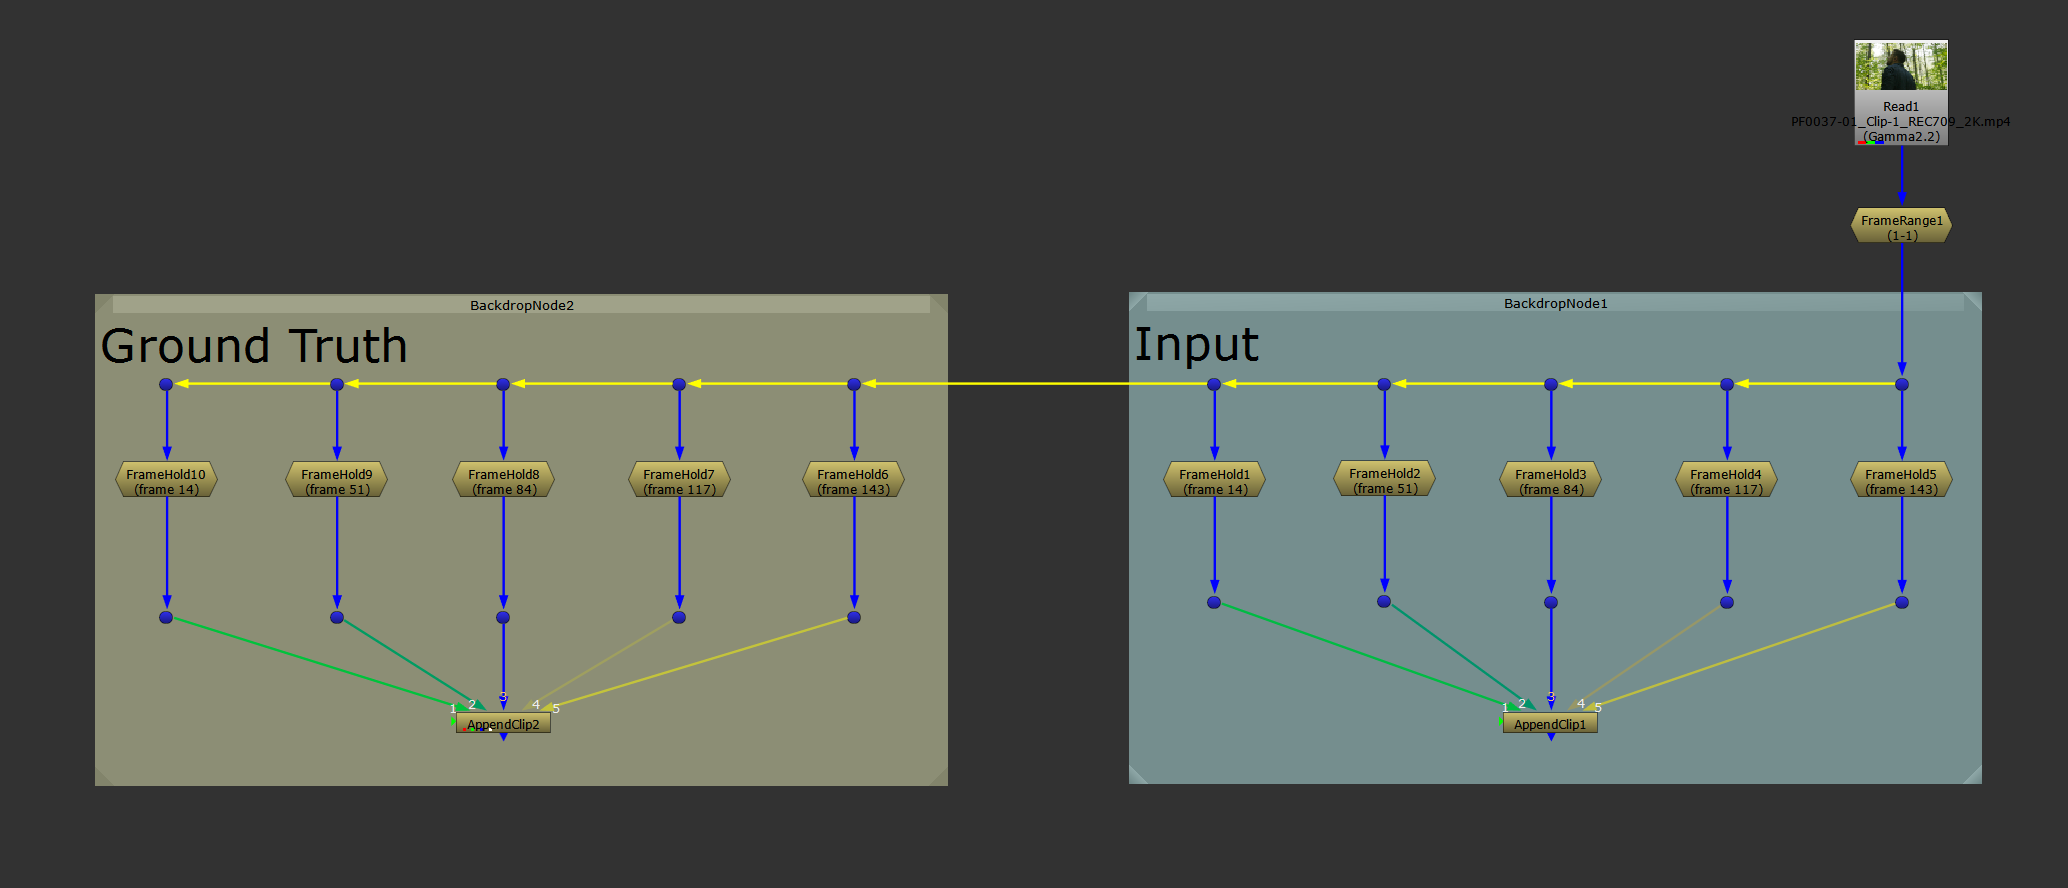
Making two identical streams as a base for the mirror method.
It’s extremely important that the same FrameHolds on both sides are connected up to their respective AppendClip node in the exact same order. The two image sequences have to match each other perfectly, otherwise CopyCat will be comparing the wrong images, and you'll get errors in your training.
So, you're essentially creating the same exact setup on both sides, except the Ground Truth section will have your effect applied to its images, while the Input side stays untouched.
Next, add your effect to the images on the Ground Truth side, for example some paint work:
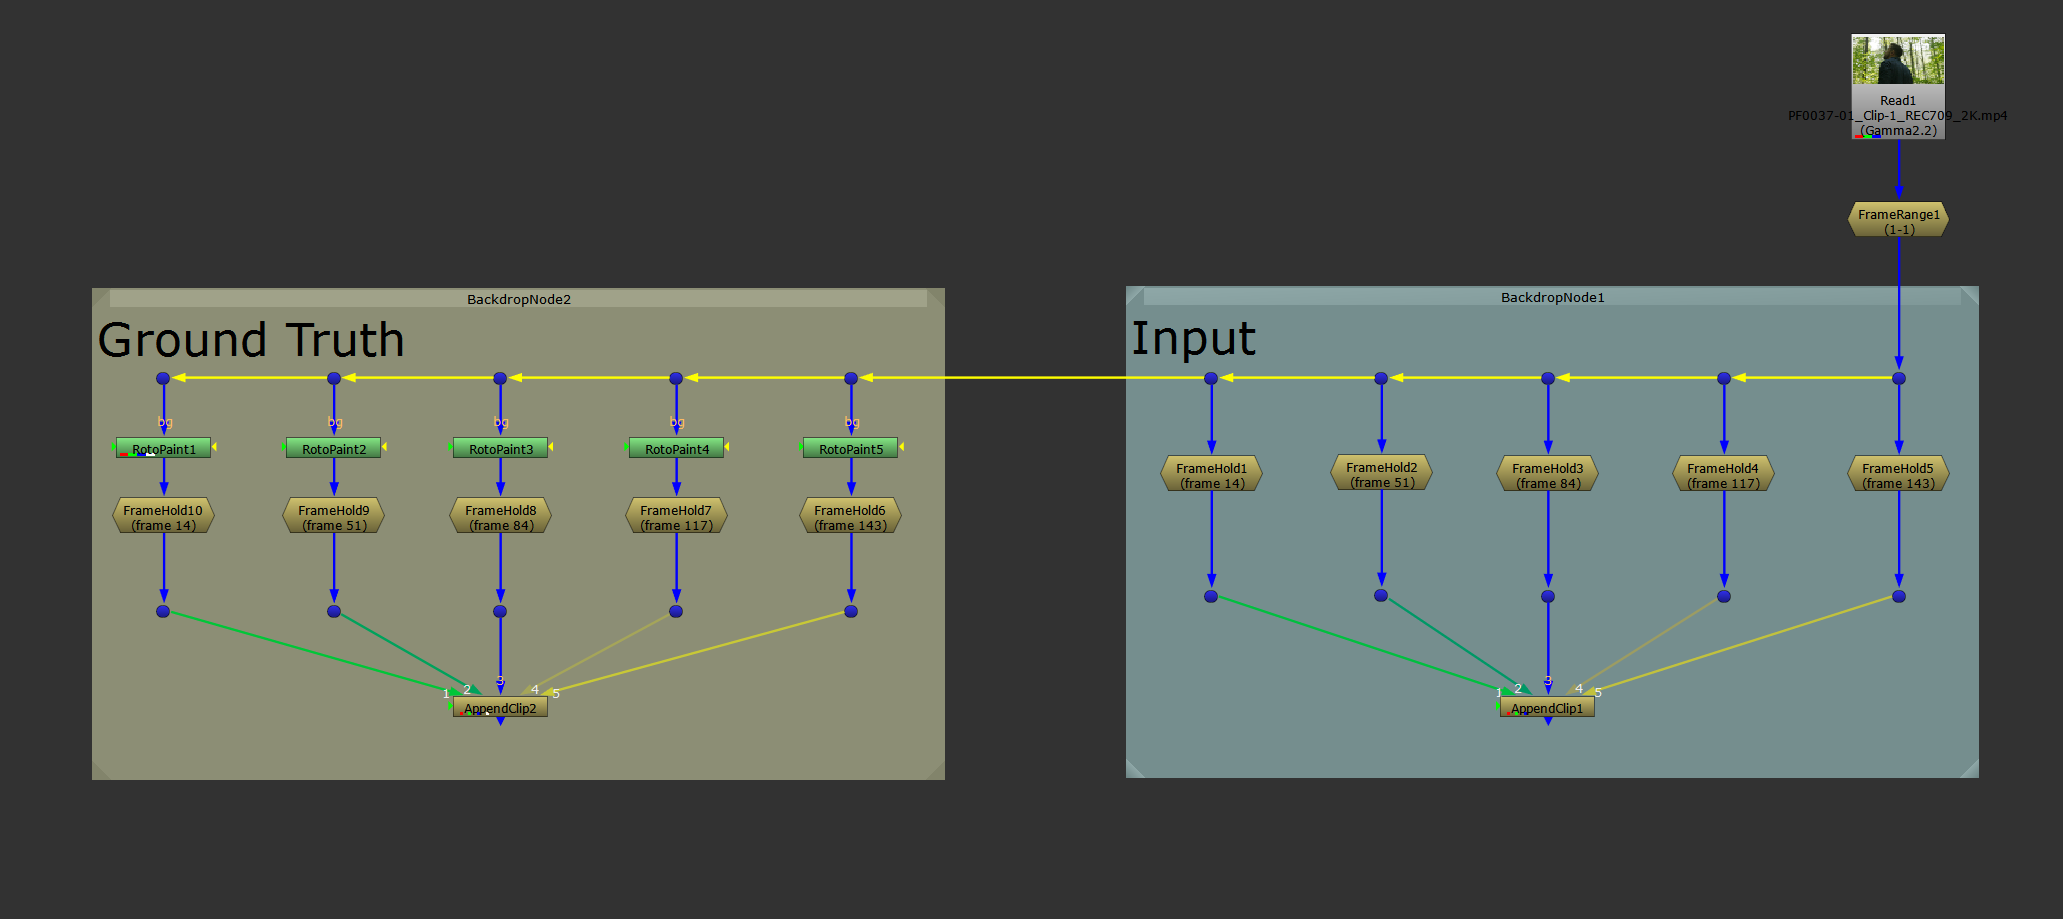
Adding your effect to the Ground Truth images.
To help visually ensure that you have connected up the images to their AppendClip node in the same order, you can select both of the AppendClip nodes and hit Alt + P to enable their postage stamps.
That'll make it easier to see that they are both showing the correct image (from the same image pair) on the same frame, and it'll help distinguish between the two streams.
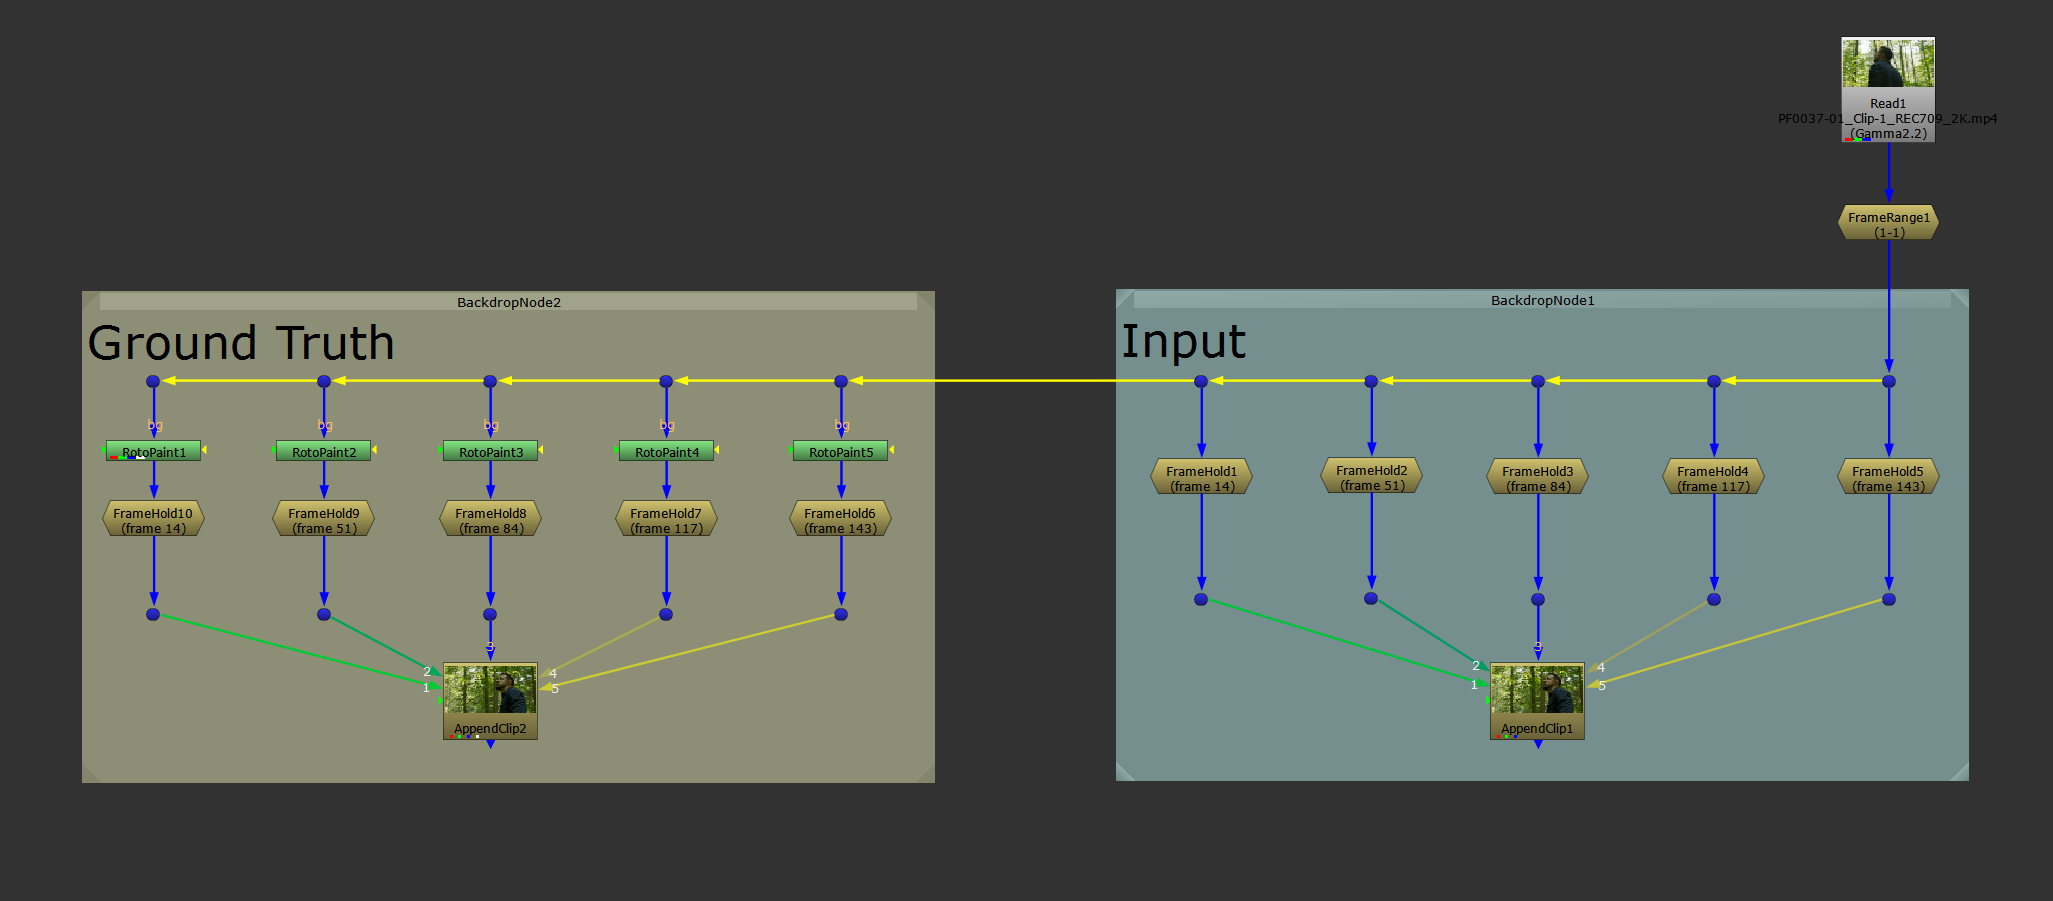
Enabling the postage stamps in the AppenClip nodes.
Finally, crop any overscan with a Crop node (identical on both sides), and ensure that both streams only pipe through the channels that are needed.
In this case, that would be the red, green, and blue channels from both sides. (However, when you’re copying roto work, for instance, that could be the red channel only from the Ground Truth side, and the RGB channels from the Input side).
In other cases, you may be using other layers as well. Keep just the ones you need so that CopyCat doesn’t have to perform any training on layers you won’t use, wasting time and resources.
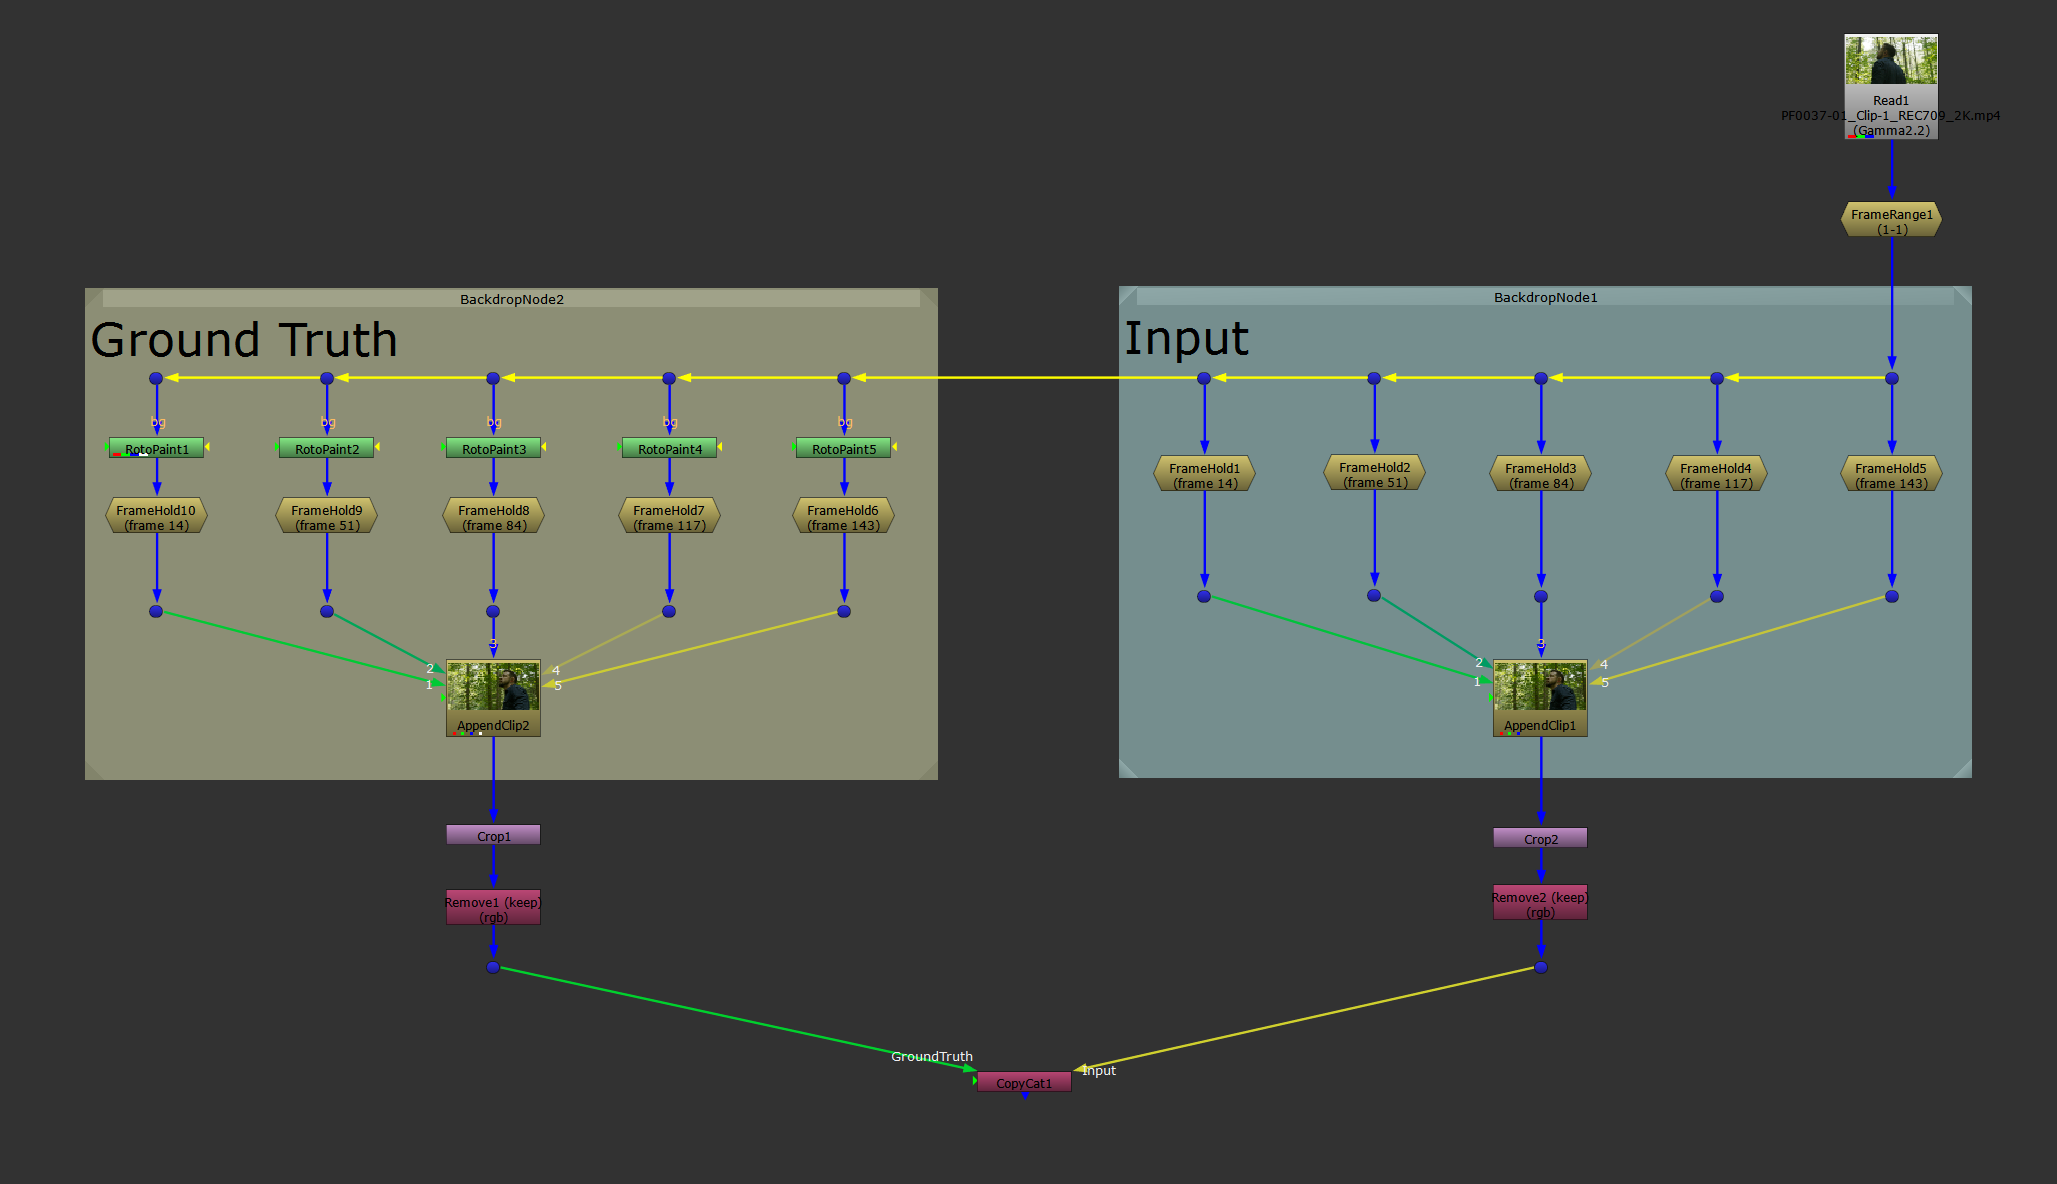
The mirror method.
The mirror method is visually quite easy to read in your script. However, it requires more nodes and a larger setup, and it runs the risk of causing errors if the AppendClip nodes are not connected up in the exact same way.
Shuffle Method
For the shuffle method, you don't need to copy the FrameHolds and AppendClip nodes and make a separate stream for the Ground Truths.
Instead, you pipe both the original Input images and your altered Ground Truth images through the same stream using additional layers.
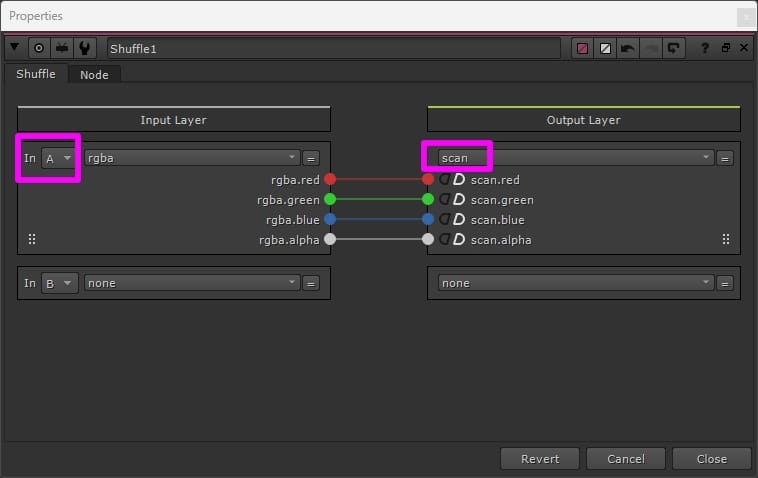
For example, you could make a new layer called “scan” (you can name it anything you like) and shuffle the original Input images into that layer. And then, do all your work on the RGBA layer, leaving the “scan” layer untouched, before piping both through the same AppendClip node.
Then, shuffle out the “scan” layer – the Input – after the AppendClip node into a separate stream alongside the RGBA, or Ground Truth.
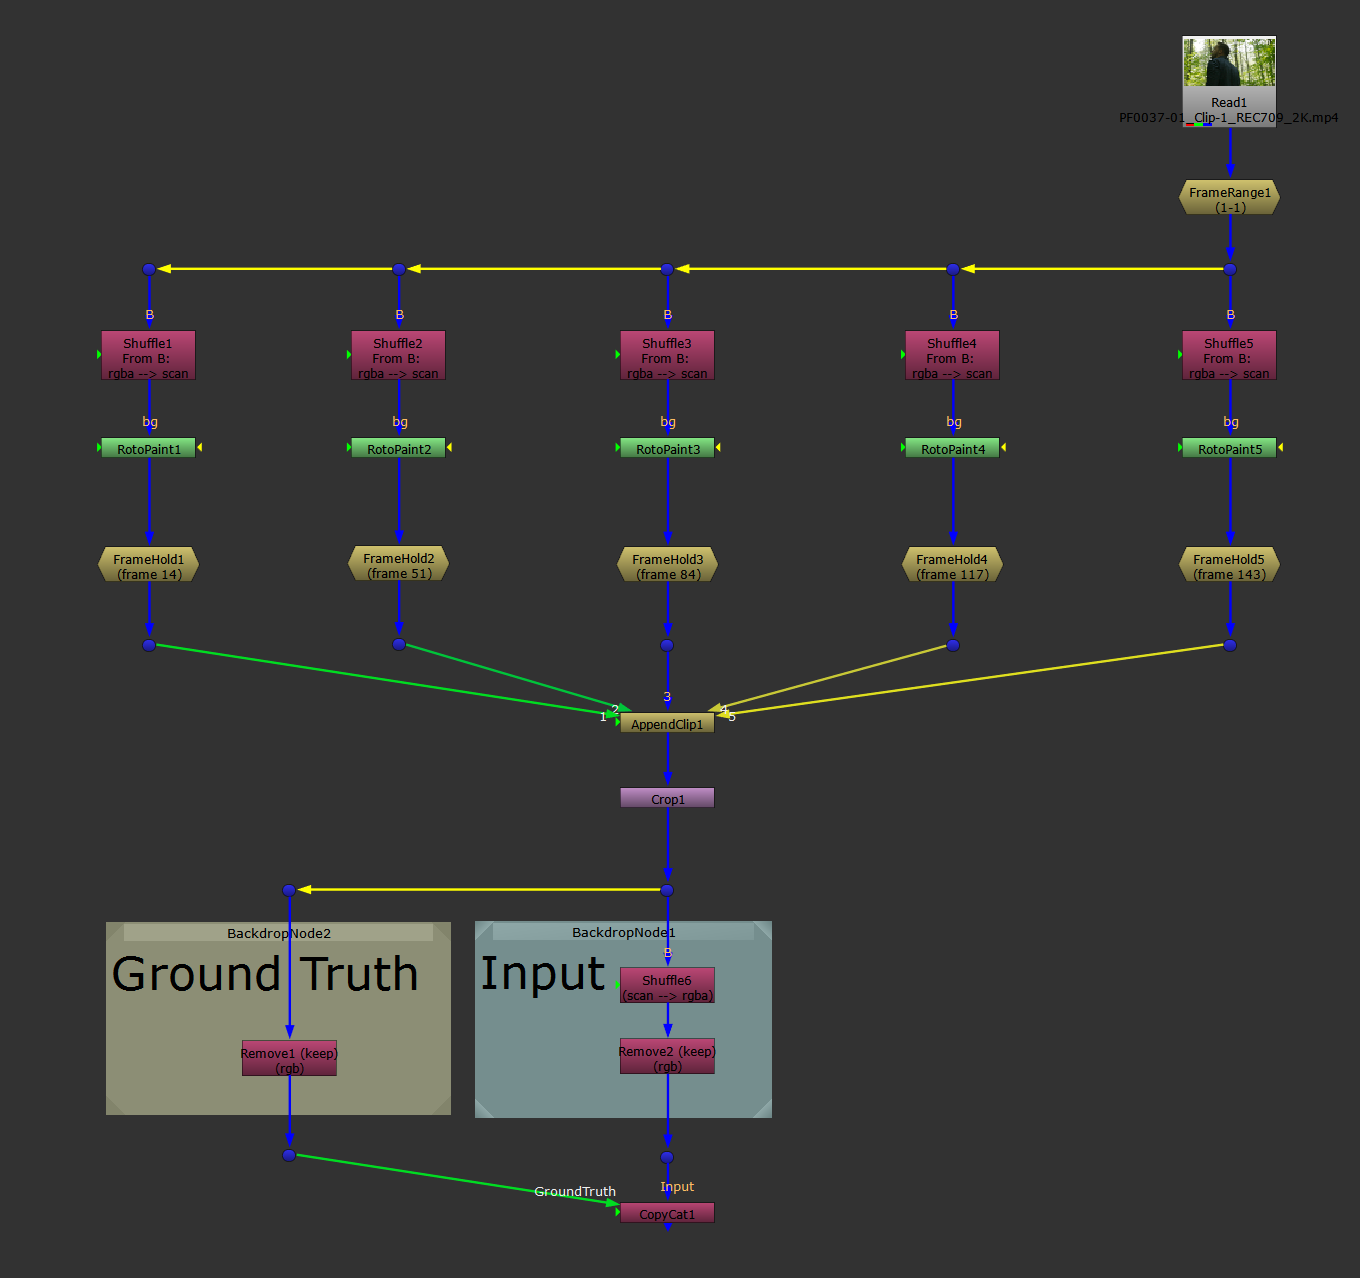
The shuffle method: shuffling the original Input images into another layer (e.g. the “scan” layer) so that they can pass through the same pipe as the Ground Truth images.
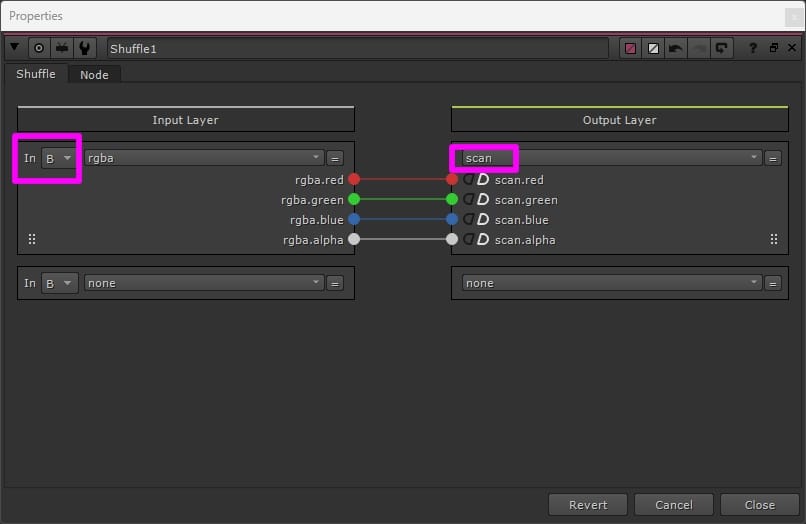
Shuffling the original Input’s RGBA channels into the “scan” layer.
It’s extremely important that you don't alter the original Input images. Otherwise, you'll introduce a disconnect between the images that CopyCat learns to apply the effect to, and the actual images that the Inference node will receive to apply the effect to later – causing artefacts.
And so, either:
In the properties of all the nodes and gizmos that you use to create your effect, make sure to change the affected channels from All to RGBA.
Or, better yet - like I’ve done below:
Shuffle the untouched “scan” layer into the stream only after applying your effect, to guarantee that it remains unchanged.
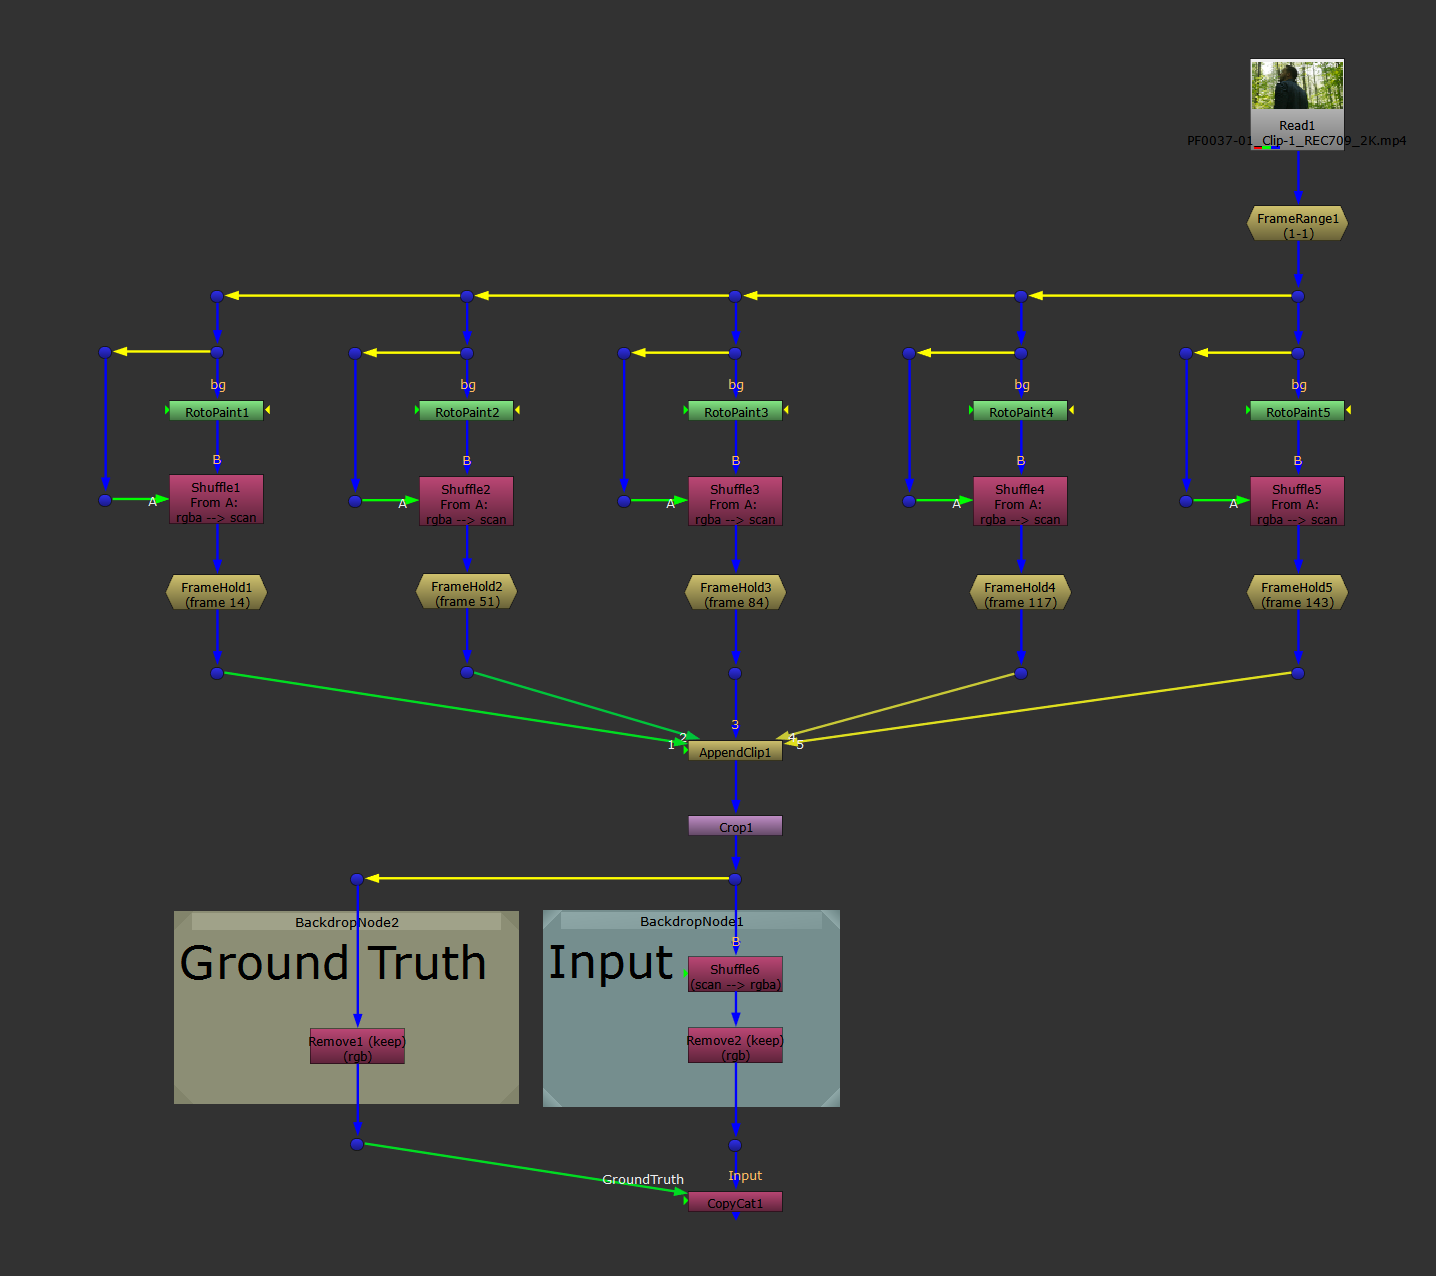
The safer shuffle method: shuffling in the untouched original Input images after applying the effect which creates the Ground Truth images.
Shuffling the original RGBA channels from the A-input into the “scan” layer.
The shuffle method is a little bit more convoluted since you're shuffling things into other layers. And there's a risk of accidentally altering the Input images with a node set to affect All channels. (If you’re not shuffling in the original Input images after applying your effect, like I did in the last example above).
However, it requires fewer nodes and a smaller setup, and there is only one AppendClip node – which eliminates the potential connection order problem.
You can use whichever method you prefer – just be aware of the caveats with each method and adjust your setup accordingly.
With both an Input stream and a Ground Truth stream ready, we can now move on to the main event:
The CopyCat Node
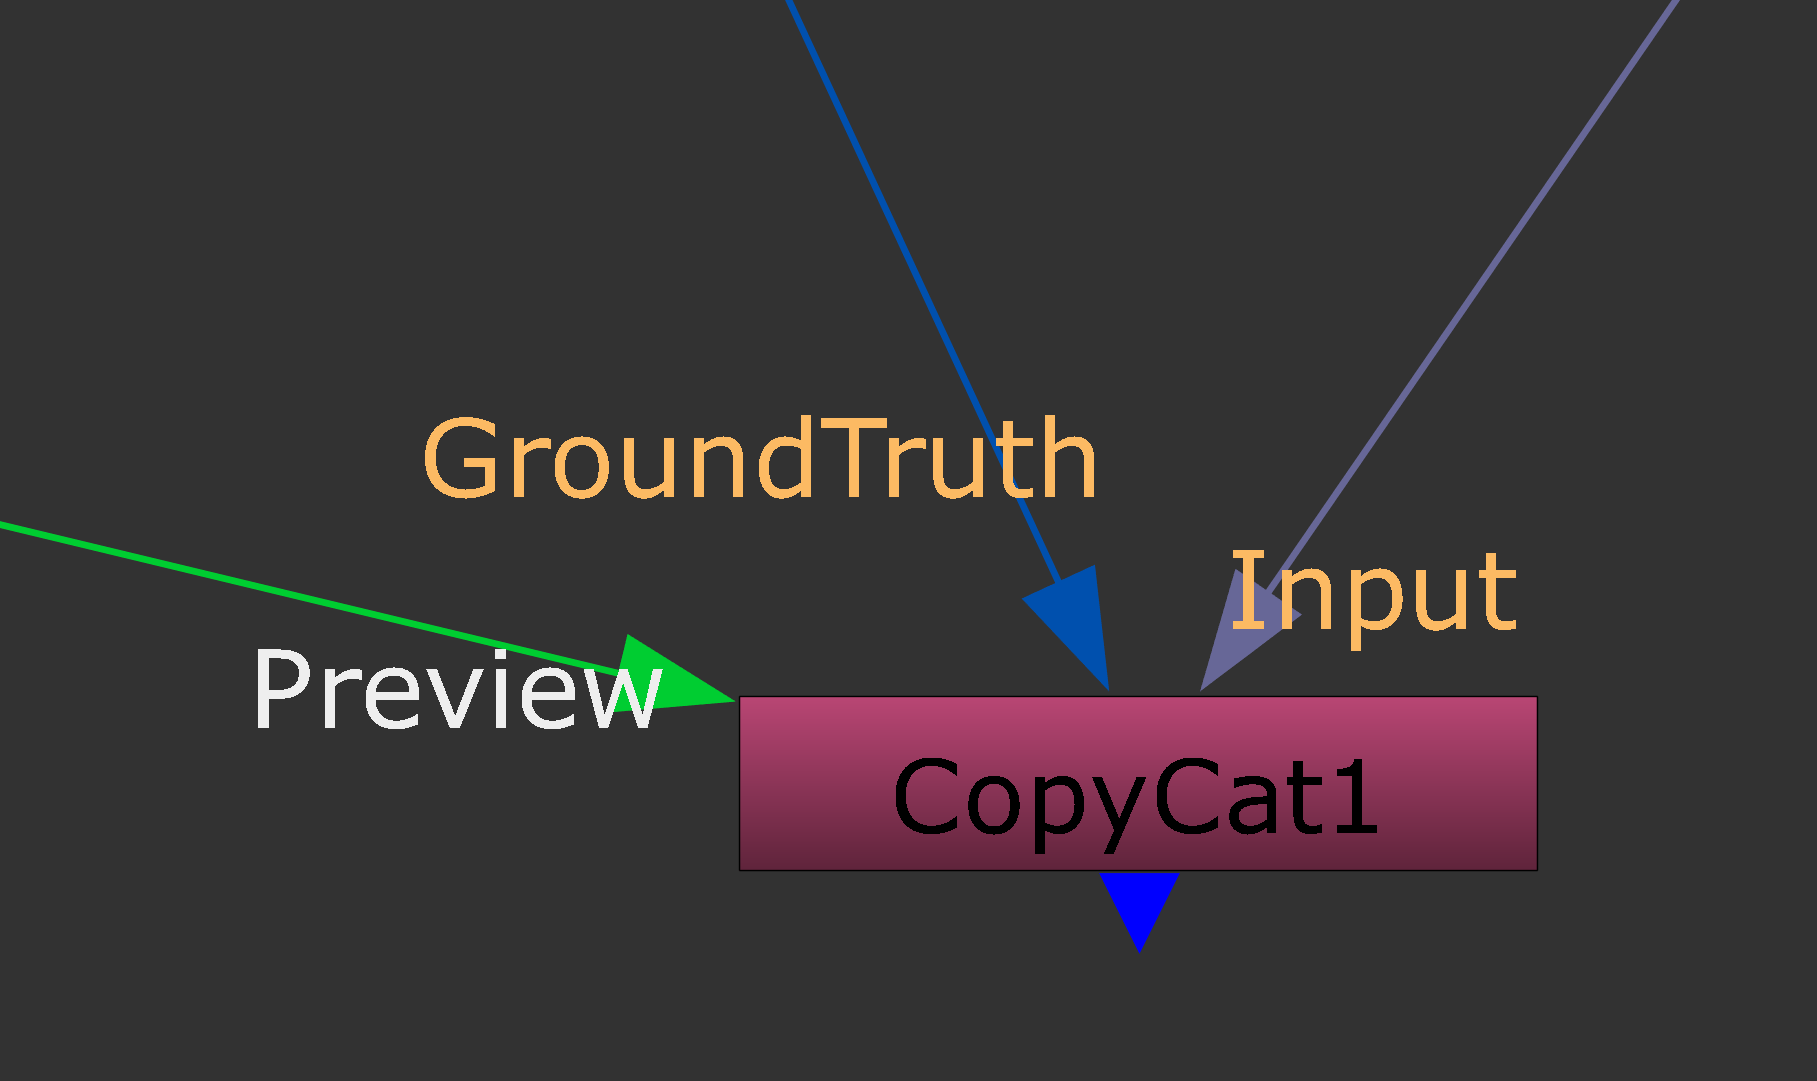
The CopyCat node.
Inputs
The CopyCat node has two main input pipes: the Input and the GroundTruth – and once you connect up those two, a third, previously hidden input pipe appears: the Preview.
Like we've seen, you can think of the Input and the GroundTruth as the “before and after” example images to use for the training, respectively. And the Preview is simply an optional input for checking CopyCat’s progress during the training:
- The Input pipe should be connected to the before image examples – typically a selection of frames from the original scan. Connect the Input pipe up to an Input stream like the ones we made before.
- The GroundTruth pipe should be connected to the after image examples – the ‘desired output’ – i.e. what you want the input to end up looking like. Note that the GroundTruth images must be in the same sequence order as their corresponding Input images. Connect the GroundTruth pipe up to a Ground Truth stream like the ones we made before.
- The Preview pipe can optionally be connected to an image for testing how the effect is currently working while CopyCat is training. At every checkpoint of the training, CopyCat will perform an inference on that image to show you how the training is progressing in the Viewer. If you like, connect the Preview pipe up to your scan (on a different frame to the ones in your data set) or to another image sequence that you want to preview the effect on. (Press Q in the Viewer to hide the Contact Sheet to be able to see the full frame of the Preview).
Properties: CopyCat Tab

The CopyCat tab in the properties of the CopyCat node.
In the first tab of the CopyCat node's properties (simply named CopyCat), you can find all of the settings for training a model on your effect:
↪ Use GPU if available
CopyCat will often perform millions of calculations during the training, but it can run calculations in parallel which drastically speeds up the process.
By using the GPU (graphics card), it can run many more calculations in parallel than it’s able to do on the CPU (processor). So it's highly recommended to tick this checkbox if you have a supported graphics card.
↪ Data Directory
During the training, CopyCat will output a large number of different files and store them on your system.
This training output consists of:
- Checkpoints that store the network weights.
These are .cat files which are saved at every Checkpoint Interval – a setting which you change in the CopyCat node’s properties (every 1,000 steps by default).
The .cat checkpoint files contain all of the training data up to that point, and can be loaded into an Inference node to see the results of the training on a full image.
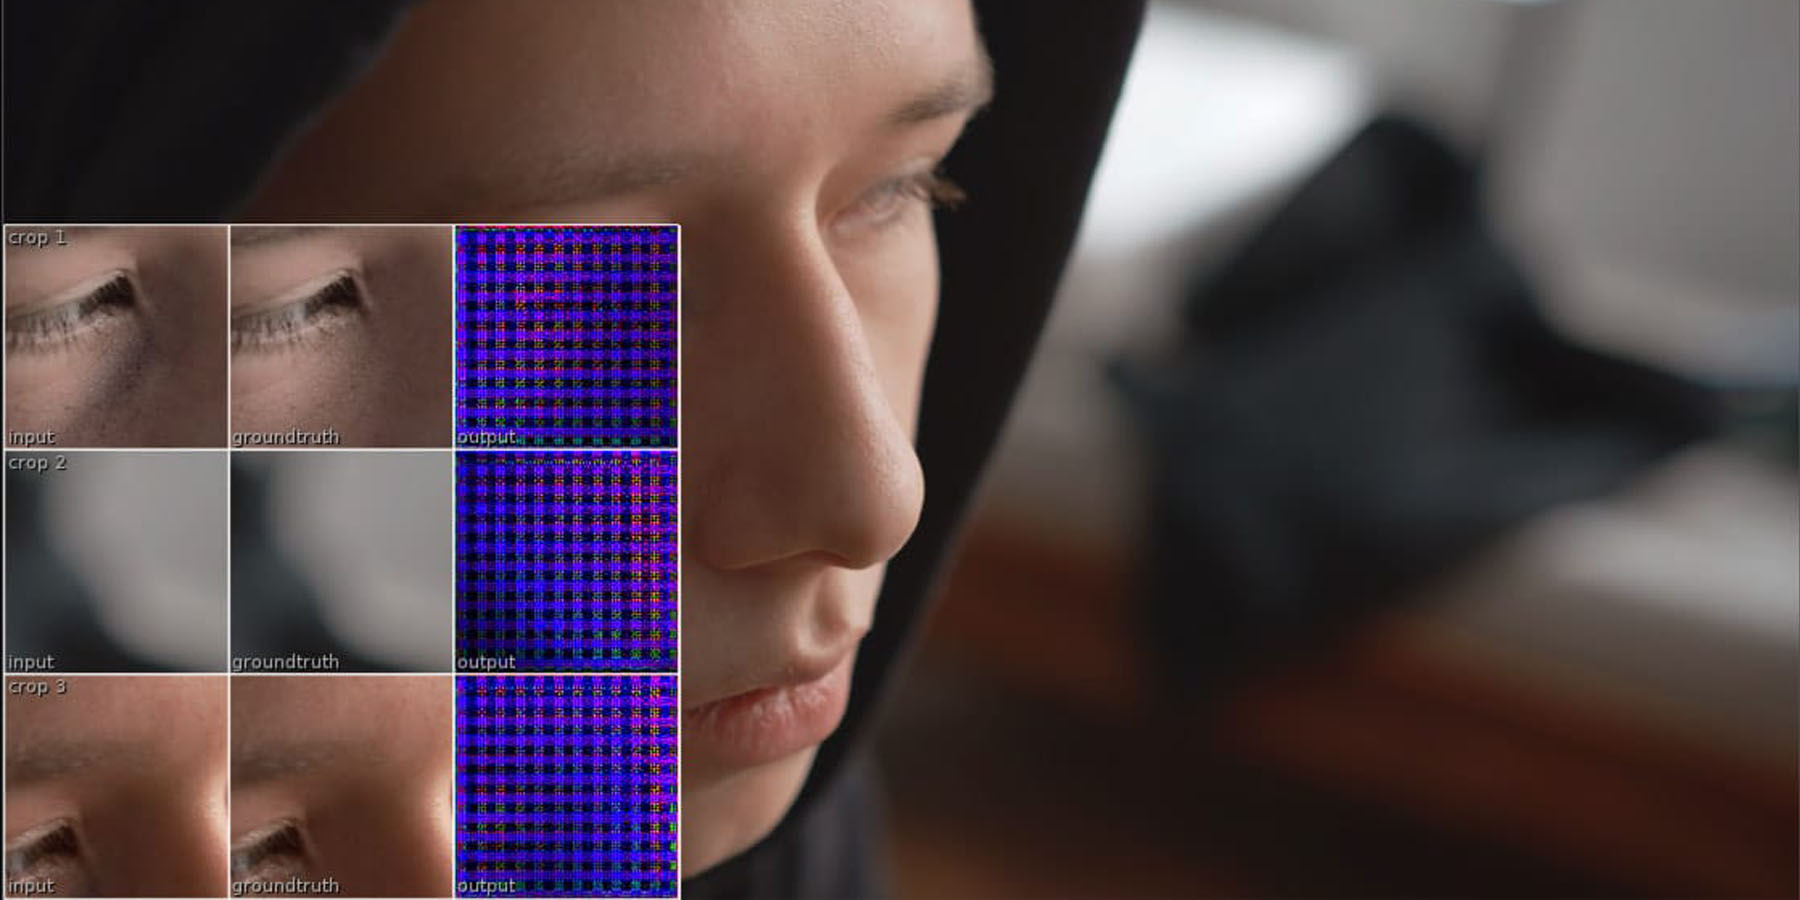
- Contact Sheet and Preview images that show how the network is performing at a given step. (Preview images are only available if the optional Preview input is connected).
These are .png images which are saved at every Contact Sheet Interval – a setting which you change (every 100 steps by default).
The Contact Sheet images are overlaid in the Viewer during training, in a 3 by 3 grid (or 3 by X, if you are outputting extra layers). This grid shows three of the random crops that CopyCat has selected, at a time, with each column displaying: the input (left column), the ground truth (middle column), and the output (right column).
The goal is to get the output to match exactly to the ground truth. (This happens over time – at first the output might look like a garbled mess, which is normal).
The Preview images are displayed full-size in the Viewer, showing the current progress of the effect applied to an image of your choice (which can be outside of the training image set). Press Q in the Viewer to hide the Contact Sheet to be able to see the full frame of the Preview.
You can also directly view the saved .png images on your computer to keep an eye on the training progress.
- A Summary that contains graph data to visualise the training process.
This is a .summary file which records the loss value (i.e. the difference between the ground truth and the output) at each step. It’s used to build the graph that is displayed in the Progress tab of the CopyCat node’s properties.
The graph shows the Loss in the Y-axis and the Steps in the X-axis – i.e. the graph shows errors over time. The goal is to lower the errors as close as possible to zero, so if the graph is trending downwards during the training, it’s heading in the right direction.
- Progress files with the most up-to-date training data.
These are .ost files that allow CopyCat to resume training should the process fail or be stopped manually. They contain the latest updates to the training data between the previous and upcoming .cat checkpoint.
Click on the little folder icon to browse to, and select, a location on your hard drive where you want to store the files above.
(No filename needed, just a path to a folder).
↪ Epochs
The Epochs value represents the number of times CopyCat processes the entire data set (i.e. all of the Input and Ground Truth images) during training.
Epochs are also used to determine the number of Total Steps plotted on the Graphs tab (a number which also affects how many training files will be saved), using the following equation:
Total Steps = Epochs * (Data Set Size) / (Batch Size)
(The Data Set Size is the number of Input and GroundTruth image pairs connected to CopyCat).
For example, 10,000 Epochs over a data set of 6 image pairs with a Batch Size of 4 is equal to 15,000 steps.
Higher Epochs values generally produce better trained networks, but at the cost of longer processing times. However, at a certain point you’ll likely start to see diminishing returns, and possibly even worse results, by further increasing the Epochs. So some experimentation is needed here. – And you can always go back to an earlier checkpoint if the results start to get worse.
The default Epochs value of 10,000 is a good starting point, and it can help you get a clear idea of what’s working and what’s not working, but you may have to increase this value later to get better results. You may even be able to lower it, if you’re using pre-trained models as a base, and still get the result you’re after.
– In any case, you can change the Epochs value at any time, and resume the training. And, you can also stop the training at any point if the output is matching the ground truth and you’re happy with the result.
↪ Start/Resume Training
Click the Start Training button to begin teaching the network how to replicate the desired effect.
You can pause the training at any time by hitting Cancel, and then resume it by clicking the Resume Training button. You could for example pause the training, add more images to the training set, or change the number of Epochs, and then resume the training.
Or, continue training from a saved checkpoint. (See Initial Weights below).
↪ Create Inference
Creates an Inference node with the latest .cat file preloaded.
You could also create an Inference node through the Tab menu, like any other node, but it would be blank and you'd have to manually navigate to the .cat file.
↪ Initial Weights
In this drop-down menu, you can choose whether to train a network from scratch, or start from an existing set of weights which will speed up your training.
- None: Start the training with all the weights at their default values – a blank slate.
- Checkpoint: Start the training from an existing checkpoint of your choice. This option lets you continue training from a previously saved .cat file, using its already trained weights as a base. For example, using the training from one shot as a base for the training on another, similar shot in the sequence.
- Deblur: Start the training with a network already trained on deblurring images. This will speed up any deblurring training, or other training for a similar effect, such as an inpainting task.
- Upscale: Start the training with a network already trained on upscaling images. This will speed up any upscaling training, or other training for a similar effect.
- Human Matting (Large, Medium, Small): Start the training with a network already trained on creating mattes for humans. This will speed up any roto training for humans and similar characters.
The Large, Medium, or Small options refer to the Model Size. A large Model Size is generally better to use for a wider range of more complex shots but will take longer to train, while a smaller model size will mostly work for simpler, more similar shots in a sequence and will be faster to train.
↪ Model Size
The number of different parameters that are available to CopyCat for adjusting weights while training depends on the size of the model in use.
There are three sizes to choose from: Small, Medium, and Large:
The Small model is faster to train and uses less memory, but may not always give the best results. It’s typically best used for simple effects, like deblurring or upscaling, that will be applied to very similar shots.
The Large model is slower to train and uses more memory, but should be able to generalise better. This model size is best used for more complex effects, such as human matting, for a wider range of shots.
The Medium model sits in between the two – a happy medium between speed and quality in many cases – and is the default option.
↪ Batch Size
The Batch Size is the number of input and ground truth image pairs to train with at each step.
By default this is set to Auto (which calculates the Batch Size automatically based on the available GPU memory), but you can change it to Manual and set your own Batch Size.
A smaller Batch Size can make the training slow and inefficient, but a larger size can cause your graphics card to run out of memory.
A larger Batch Size will typically produce a smoother loss curve and more stable training, while a smaller Batch Size may help the training converge faster on small data sets.
For most scenarios, a Batch Size between 4 and 16 will be suitable.
↪ Crop Size
When training the network, CopyCat doesn’t work on the entire frames of the input and ground truth image pairs at once. That would cause your graphics card to run out of memory, fast, and make the training fail.
Instead, CopyCat will take matching random crops of the input and ground truth image pairs and use those for training. By doing this again and again, thousands of times, eventually it covers the entire area of the frame in all of the images in the training set.
The Crop Size determines how large these random crops will be. By default, it’s set to 256 x 256 pixels, but you can set it higher or lower.
A higher Crop Size requires more memory, but gives CopyCat more context during training. A smaller Crop Size will be faster, but may not give as accurate results.
For small pixel operations such as deblurring or upscaling, it’s fine to use a small Crop Size, because CopyCat only really needs to “see” a few pixels at a time to learn the effect. But for larger effects, like roto tasks with matte shapes that need a bit more context, or when training on high resolution footage, you'll usually be better off choosing a larger Crop Size for CopyCat to work with.
↪ Checkpoint Interval
The Checkpoint Interval is the interval at which CopyCat saves a checkpoint with the current weights in a .cat file during training.
By default, this is set to every 1,000 steps, but you can change it to anything you like.
↪ Contact Sheet Interval
The Contact Sheet Interval is the interval at which CopyCat saves a contact sheet of its current output during training.
By default, this is set to every 100 steps, but you can change it to anything you like.
↪ Use Multi-Resolution Training
Enabling this checkbox allows CopyCat to temporarily reduce the resolution of the input and ground truth images, and perform its training in three stages:
- Low-resolution stage at a quarter resolution. This considerably speeds up the initial training, at the cost of losing some accuracy.
- Medium-resolution stage at half resolution. This also speeds up the training, and starts to get more accurate.
- High-resolution stage at full resolution. This lets the model learn from the fine details and achieve optimal results.
By enabling the checkbox, CopyCat can train the model up to twice as fast as normal.
Properties: Progress Tab
In the second tab of the CopyCat node's properties (named Progress), you can monitor how the training is progressing:
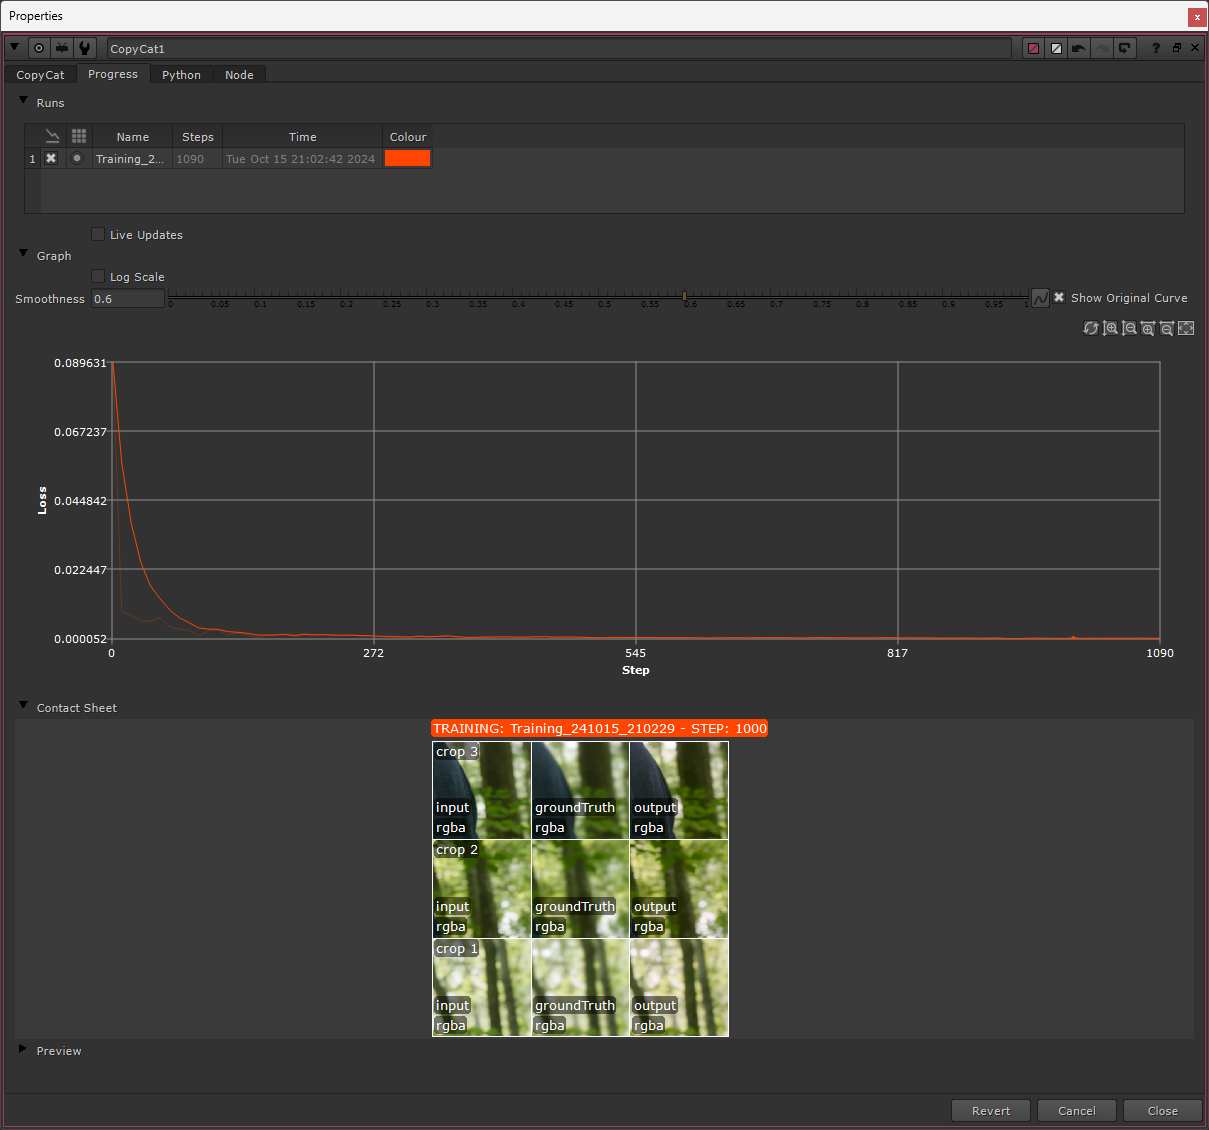
The Progress tab in the properties of the CopyCat node.
↪ Runs
At the top you can find each ‘Run’ (i.e. training session) saved in the current Data Directory.
You might for example save all of your CopyCat training for a project in the same folder. If so, you can find and select them here.
With multiple training sessions saved, you can right-click on a specific run to:
- Toggle its visibility in the Graph.
- Delete that training run and its associated files.
- Create an Inference node using the latest .cat file from that run.
- Resume the training in that run.
There’s also a Live Updates checkbox here. If you enable it, CopyCat will periodically scan the Data Directory, and update the Runs table, the Graph, the Contact Sheet, and the Preview displays with the latest run.
↪ Graph
Next, you’ll find the Graph displaying the training progress.
Like mentioned previously, the graph shows the Loss in the Y-axis and the Steps in the X-axis. Keep an eye on the curve, especially at the beginning of the training. If it’s trending towards zero, it’s heading in the right direction and the training should be going as expected.
When the training has been running for a while, and the Loss value is getting near zero, it can be tricky to judge whether the model is improving by looking at the original graph. (See for example the picture above).
If so, you can enable the Log Scale checkbox to change the Y-axis from linear to logarithmic, allowing you to see more detail in the curve at lower values.
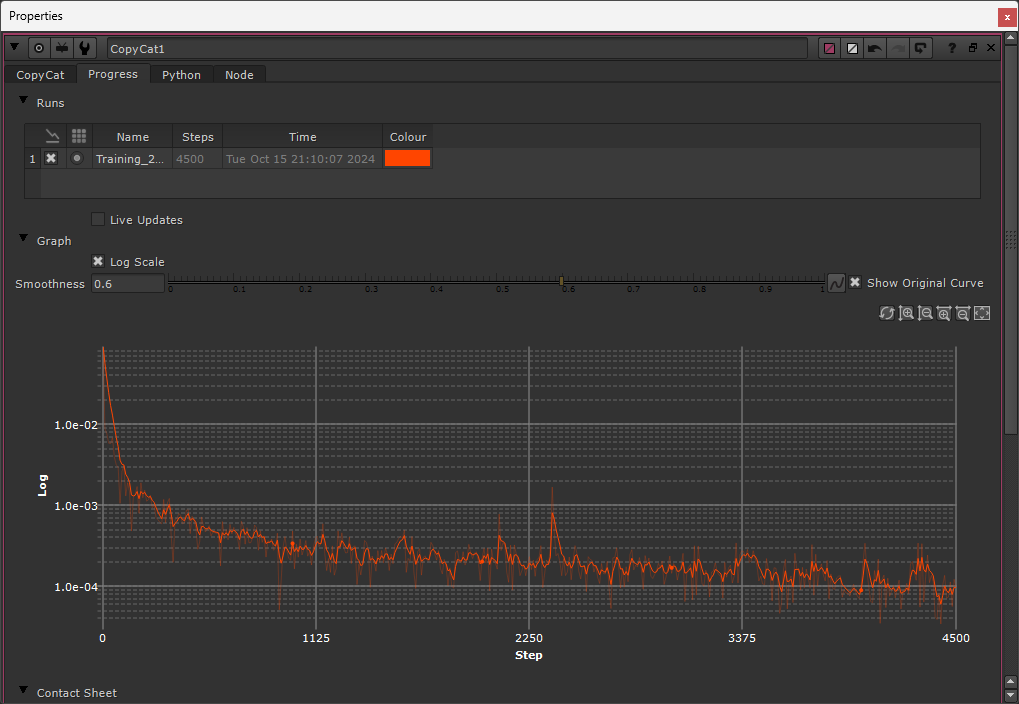
Enabling the Log Scale checkbox allows you to see more detail in the curve at lower values.
There is also an option for smoothing out the curve in order to focus more on the overall trend, rather than the local peaks and valleys. The default Smoothness value is 0.6, but you can increase and decrease this as you like.
Enabling the Show Original Curve checkbox allows you to see the unsmoothed curve as a faint overlay together with the smoothed curve. (This shows the same curve as when setting the Smoothness to 0).
Lastly, on the right, you can find buttons for refreshing the view, zooming in and out of the Y-axis and the X-axis, and resetting the view.
↪ Contact Sheet
Here, you’ll find the last Contact Sheet that was saved during the training.
↪ Preview
Here, you’ll find the last Preview image that was saved during the training.
Those were all of the settings in the CopyCat node.
Using all of that information, you can have CopyCat run the training on your data set (there are more tips later in the article as well). And when you’re happy, let’s move on to the node which actually makes use of the model that CopyCat creates:
The Inference Node
The word Inference means “a conclusion reached on the basis of evidence and reasoning”.
And that's what this node does: based on the resulting model from the CopyCat training, the Inference node can infer what to do with an input image to get it to look like the example ground truth images.
That is, it can apply the same effect to images which CopyCat has never trained on before, based on the ‘evidence’ (i.e. training data) that you provided to it.
Properties
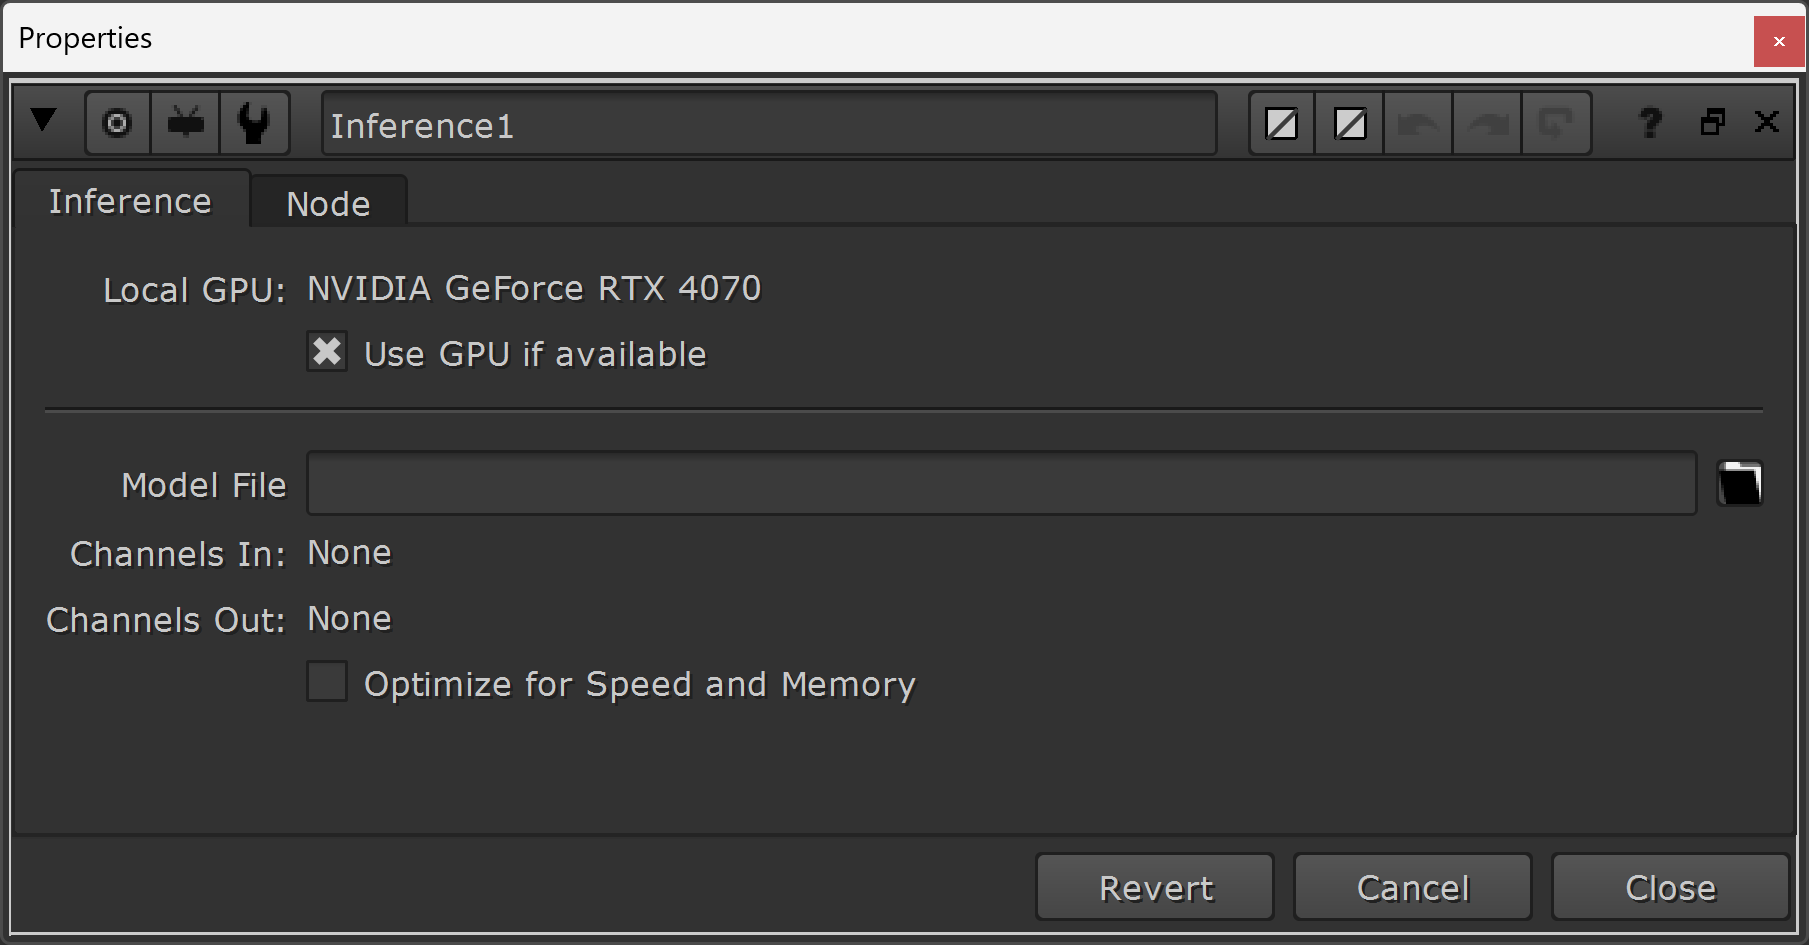
The properties of the Inference node.
The Inference node doesn't have a whole lot of properties:
↪ Use GPU if available
By enabling this checkbox, Nuke will calculate the Inference node on the GPU instead of on the CPU, considerably speeding up the rendering.
↪ Model File
Here, you can browse to and select your desired .cat file to use for the inference.
This will typically be the latest .cat file from the training, but it doesn't have to be – sometimes an earlier checkpoint will do a better job at replicating your effect.
Below the Model File field, you'll also see the input and output channels, so that you can quickly check that the Inference node is processing and outputting what you expect.
↪ Optimize for Speed and Memory
When this checkbox is enabled, the Inference node will use 16-bit half-float precision instead of Nuke's standard 32-bit float precision.
This produces results more quickly, uses less GPU memory, and can handle larger images, but can result in artefacts with some trained networks.
By default, it's turned off. Try enabling it if you're having memory issues or if the Inference is rendering slowly.
Applying The Inference
The Inference node only has a single input.
Simply plug it directly into the image sequence that you want to apply your effect to, and watch the magic happen.
CopyCat Tips
There are many things you can do to speed up the CopyCat training, increase the quality of the results, and make the process easier for yourself:
Augment The Training Data
Similar to how you can adjust the scan in the alpha stream of a keying setup in order to pull a better key, you can also make adjustments to the training data in order for CopyCat to produce a better result.
There are plenty of ways to do this:
↪ Crop In To Focus On The Effect
Like described earlier, CopyCat takes a whole bunch of random crops of the data set during training.
Which means, if your effect isn’t very large in the frame (for example if the effect consists of beauty work in a small area), CopyCat won’t “see” it very often. Most of the random crops will be taken from other areas of the frame where no changes have been made.
You can help CopyCat come across your effect more often during training by adding identically cropped-in versions of your Input and Ground Truth images to your data set.
Simply add a Crop node to some (or all) of the Input images and their corresponding Ground Truth images, off to the side in new pipes, and add these new, cropped images to the AppendClip node(s).
Note that it is still important that CopyCat takes all the random crops of the unchanged areas of the frame. Because it also needs to know what not to change in the image. So keep the full, uncropped frames, and add the cropped versions as additions, not replacements.
↪ Make Identity Frames
If there are any points during the shot where you don’t see the effect in the Ground Truth images, for example when a person is turned around for a moment and you don’t see the beauty work on their face, make sure to add some example frames of this to your data set.
For these identity frames, the Input and the Ground Truth images are exactly the same. – Which lets CopyCat know that these are areas it should leave untouched.
↪ Fake Inputs And Ground Truths
CopyCat is essentially just creating “rules” for what to do with your input image, and so you can actually create fake scenarios which can help it do just that.
If you’ve made some roto examples of a person in front of a wall with a sky behind it, for example, but the person later moves so that they intersect with the sky, you don’t always need to make new Ground Truth examples from scratch.
You can take the roto example you’ve already made for when the person in front of the wall, premultiply that image, and transform the person up and merge them back over the image so that they intersect with the sky. Crop in on the intersecting area, and voilà: you’ve got a new, valid image for training. Make sure to do this in the exact same way for both the Input and Ground Truth images.
You can try cropping, rotating, flipping, grading, and repositioning the image – simulating various different scenarios – in order to improve the data set. This can be particularly effective in certain situations such as when there are shadows in the affected area. Grade the frame darker to fake shadows, or move a subject/object over to another shadowed area in the frame, for example.
Victor Perez and Luca Prestini show several ways of setting up different augmentations in this video:
CopyCat with @nodebynode: Live machine learning on his upcoming project.
↪ Beware Of Super Bright Values
If you have super bright values in your image – values far above 1 – it might help CopyCat to clamp those values before the training.
If your effect is in an area without any super bright values, add a Clamp node to your scan before the training, and restore the clamped values after the Inference node. You can use a Merge (from) with the A-input connected to the clamped footage and the B-input connected to the unclamped footage to isolate the super bright values that were clamped, and Merge (plus) those (A) with your output (B).
If your effect is in an area that does contain super bright values, however, you can instead convert your footage to Log space before training, and then back to Linear after training, using for example the Log2Lin node.
Always train your model in the same colour space as you intend to run Inference in.
Colour The Roto
If you’re copying roto work, make sure to shuffle your matte into the red channel.
This makes it easier when working in Nuke, as you don’t have to switch back and forth between the RGB and the Alpha to compare the Input and Ground Truths.
And you can also visually keep track of the progress in the contact sheet during training.
Adjust The Resulting Matte
CopyCat might leave fine holes in the roto, or fine noise outside of the roto shape, even after training for a long time. (You may only be able to see these when gamma/gaining the Viewer up or down).
If that happens, you can add a Grade node below the Inference node, and adjust the blackpoint and whitepoint until you’re happy. Make sure to tick both the black clamp and white clamp in the Grade node to keep the alpha values contained between 0 and 1.
Crop The Bounding Box
At the end of the Input and Ground Truth streams, crop out any overscan to make sure the two streams have identical bounding boxes. This ensures CopyCat is comparing the images 1:1.
Remove Superfluous Channels
Remove channels that you don’t need to process, before running CopyCat.
Any leftover channels, for example from your Ground Truth creation, that are passed through to CopyCat will demand additional processing time. And there is no need to spend extra time training on a random layer that won’t be used.
This can be as simple as removing an alpha channel, and only use the RGB channels for some paint work, or it can involve trimming multiple other layers and channels in your data streams.
Precomp The Training Set
Precomp your Input and Ground Truth image sequences, especially if any of the nodes upstream use the GPU.
That’s because CopyCat is also using the GPU, and the more resources you’re able to give it, the faster it will train.
React To The Graph
If the Loss/Steps graph is trending upwards, i.e. more errors are introduced, or starts plateauing early at a high Loss value, it could be because the AppendClip nodes are not connected up to the Input and GroundTruth images in the exact same order, or that your selected Model Size and/or Crop Size isn’t large enough.
You can also look at the contact sheet overlay in the Viewer: if the input and ground truth images don’t line up, they’re probably not connected up to the AppendClip nodes in the correct order.
If the graph is trending towards zero but the output is still not replicating the ground truth, then you can try increasing the number of epochs, and/or increasing the number of image pairs to your data set. Make sure that you have a diverse selection of images as this tends to produce the best results. And the more example images you have, the better the results tend to be.
A good Loss value is typically somewhere between 1e-3 to 1e-6, and indicates that the training may be complete. This number depends on the task – effects that take up more space in the frame, or change the Input image more, will have higher Loss values.
Augment The Inference Input
If another shot in the sequence is for example darker than the training images (but otherwise contains the same elements), you can grade the shot brighter to match what CopyCat was trained on, apply the Inference node, and then reverse the grade after.
That way, the Inference node “sees” something more familiar and can potentially better apply the effect.
Browse The Cattery
In addition to the native models in the Initial Weights menu in CopyCat, there are many other, advanced models available online in the Cattery:

Download and use whichever ones takes your fancy, but keep in mind:
Ethics & Legality
Native CopyCat models, like the Human Matting model, have been trained solely on licensed footage.
Which means, the people who did the work to create those images, were paid for that work. None of the training data was scraped and stolen, and no one's livelihood was negatively impacted in the process.
Models in the Cattery, and other models floating about on the Internet, may not have been trained on licensed images. So please exercise caution, use your own judgement, and make sure to clear any models with your studio before you use them to do any actual production work.
Convert Models Using The CatFileCreator
AI and ML research and development is happening at a rapid pace in other fields than just VFX, and using other software and file formats for creating models than CopyCat does.
It’s possible to convert non-native models into the .cat file format, however, using the CatFileCreator:
Don’t Expect Perfection
Even with plenty of good examples to train from and plenty of time to train, CopyCat will likely not produce a perfect result.
It can get very close in some cases, but often, the work it produces will only be good for use in temporary comp versions. Or, the work will only hold up at a certain distance from the camera, and not for a hero character up-close, for example.
Like described earlier, there are many things you can do to improve the training and the results, but the reality is that CopyCat typically won't produce a result that will hold up in high-end productions. At least yet. In a large number of cases, the results just wouldn't pass tech checks.
However, CopyCat can assist with the work, and help save you time. It can get the effect you're trying to make up to a point where you only need to do the fine-tuning and polishing/error-corrections.
And as mentioned before, the more effort and the better quality work that you put into it, the better the output will be.
Guides & More Info
Here, you can find further tips, tricks, and information about CopyCat and the CopyCat workflow:
Beauty work:
Removing reflections:
Deblurring:
Upscaling:
Advanced removals:
FX Guide article:
The Foundry CopyCat Masterclass Course:
The Foundry CopyCat Q&A:
Also see the machine learning sections on this page:
Creative Effects
While CopyCat can do “basic” things like roto and prep work, where it becomes much more creatively interesting is when you train it on specific effects.
For example you could train it on a bunch of sparks elements; using the RGBA of the sparks elements as the GroundTruth and the Alpha as the Input.
Then, you could literally just grab a RotoPaint node and paint an alpha and use the Inference node to create sparks, and art direct the sparks flying exactly how you want.
Substitute sparks for any other effect, for example a magical effect or a motion graphics effect, and the RotoPaint node (for generating the alpha) with for example a particle system, and you'll start to see the possibilities.
You could convincingly fake fluid dynamics:
CopyCat + Particles in Nuke.
Or create clouds:
Nuke - Use the CopyCat node to make clouds!
Or make realistically behaving fire:
Create realistic fire in nuke with CopyCat.
Build your own library of Inference nodes to create a range of custom effects.
And please share if you create something cool!
I hope you found this tutorial useful. For more Nuke tips & tricks, see Nuke.