Rendering A Labelled Layer Contact Sheet In Nuke
⭐ A workaround for the non-renderable layer names in the LayerContactSheet node…

⭐ A workaround for the non-renderable layer names in the LayerContactSheet node…
There is a Companions Exclusive Tool at the end of this tutorial
Burned-In Vs. GUI-Only Overlay
The LayerContactSheet node in Nuke has an option for displaying the layer names in the Viewer, however this is a GUI (Graphical User Interface) overlay only.
When you render the layer contact sheet, the layer names are not burned into the image. I.e. the text that you see in the Viewer disappears in the render.
To get around this, you can create your own layer contact sheet:
First, shuffle out all of the layers from your render with individual Shuffle nodes.
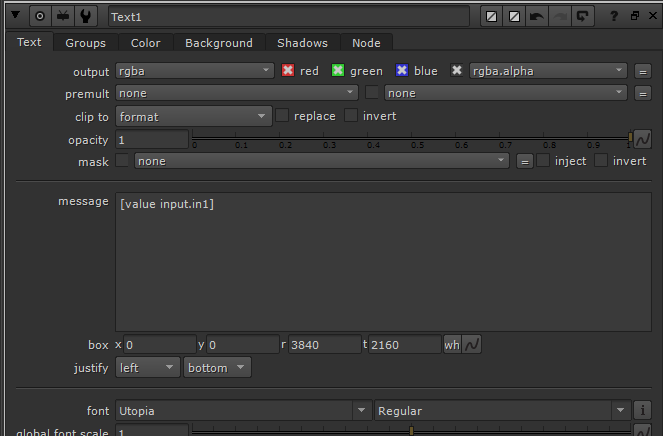
Then, create a Text node and connect it to the first Shuffle node. In the message field of the Text node, put the expression:
[value input.in1]

The Text node’s properties.
– Which will get the layer name and show it as text over your layer.
In plain English, the expression above means: get the value of the input node’s (i.e. the node upstream: the Shuffle node) in1 knob (i.e. the layer name).
Adjust the text size and position to your liking, and then copy/paste the Text node to all the other Shuffle nodes.
Then, connect all of the Text nodes to a ContactSheet node.

The setup.
Finally, adjust the ContactSheet node’s properties to get a grid layout that suits the format in which you want to render the layer contact sheet.
Attach a Write node to the ContactSheet node and now the layer names will be rendered properly.
That’s the basics for getting a working setup. Next, let’s take the setup to a whole other level.
Companions Exclusive Tool
To automate the entire process and add more advanced options, here’s a Python script packaged up into a customisable gizmo:


